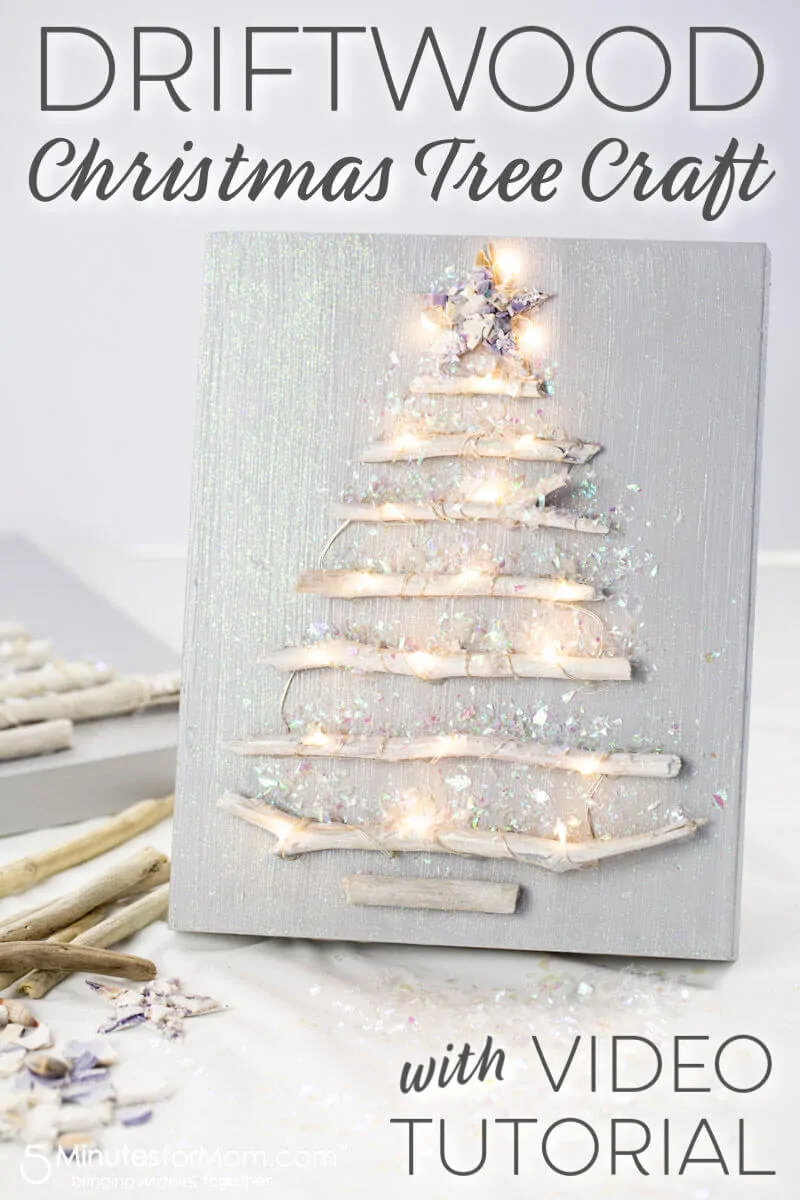
This gorgeous Driftwood Christmas Tree Craft is a wonderful Christmas DIY project to make with your family or a group of friends. You can make beachy driftwood trees to enjoy year-round or create glittery driftwood Christmas tree decorations.
This post is part of our ongoing sponsored partnership with Testors.com.
Welcome to our third week hosting Testors Crafternoons. Today, we have another Christmas craft to get you and your family in the holiday mood.
(If you missed our first two weeks, check out our posts on How To Paint Rocks For The Holidays and How To Paint Christmas Ornaments. And our final Testors Crafternoons Christmas craft is now live at DIY New Year’s Eve Photo Booth Props.)
We love to craft and any projects that involve painting earn extra points with our kids. So spending an afternoon with Testors’ paints is always popular in our house.
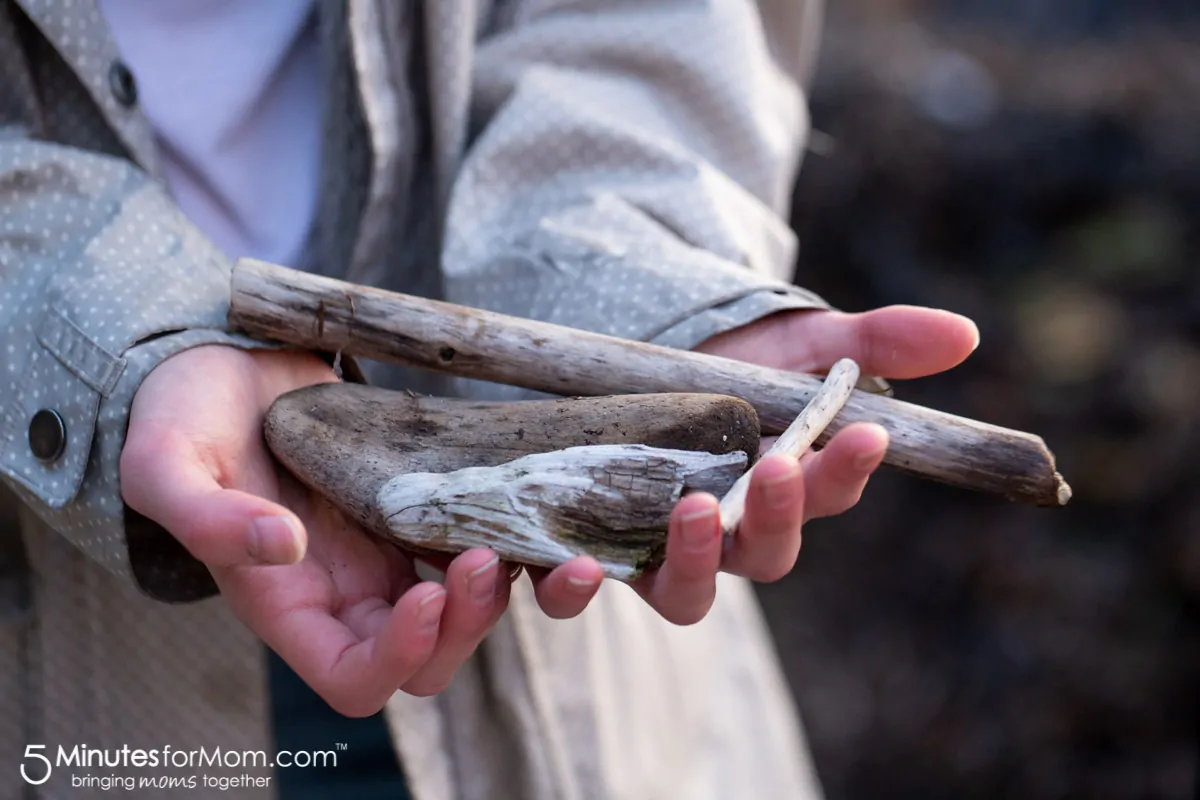
We have had some beautiful sunny fall days in the past couple of weeks and so I decided to get our girls to come with me down to the beach to collect driftwood to create some driftwood Christmas tree crafts.
Once we collected lots of driftwood and seashells, I washed and dried them all.
Then I made a couple of samples to work out all the details and resolve any kinks in my idea before sitting down with my daughter and my niece for our crafternoon.

The girls loved painting their projects and decorating their trees.
We are all just thrilled with how well they turned out. The girls are now making some little tiny Christmas Tree canvases too!
These driftwood Christmas trees are so fabulous and you can customize them in tons of different ways.
We used driftwood we collected from the beach. But if you don’t have a beach nearby you can use whatever sticks you have available.
Or you can even make driftwood! I am actually working on an upcoming tutorial on how to make your own driftwood in case you don’t live near a beach.
You can attach your driftwood Christmas trees to a canvas or wood background as we did. Or you string your tree together and hang it directly on your wall.
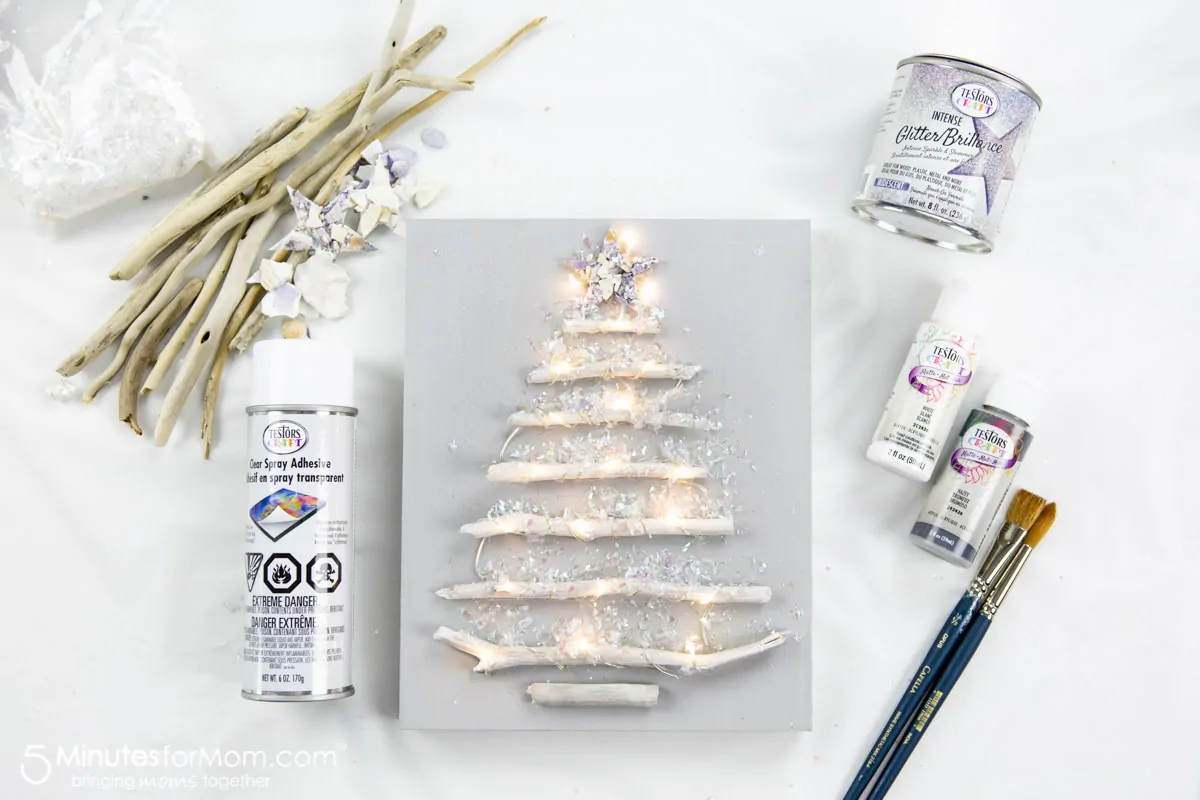
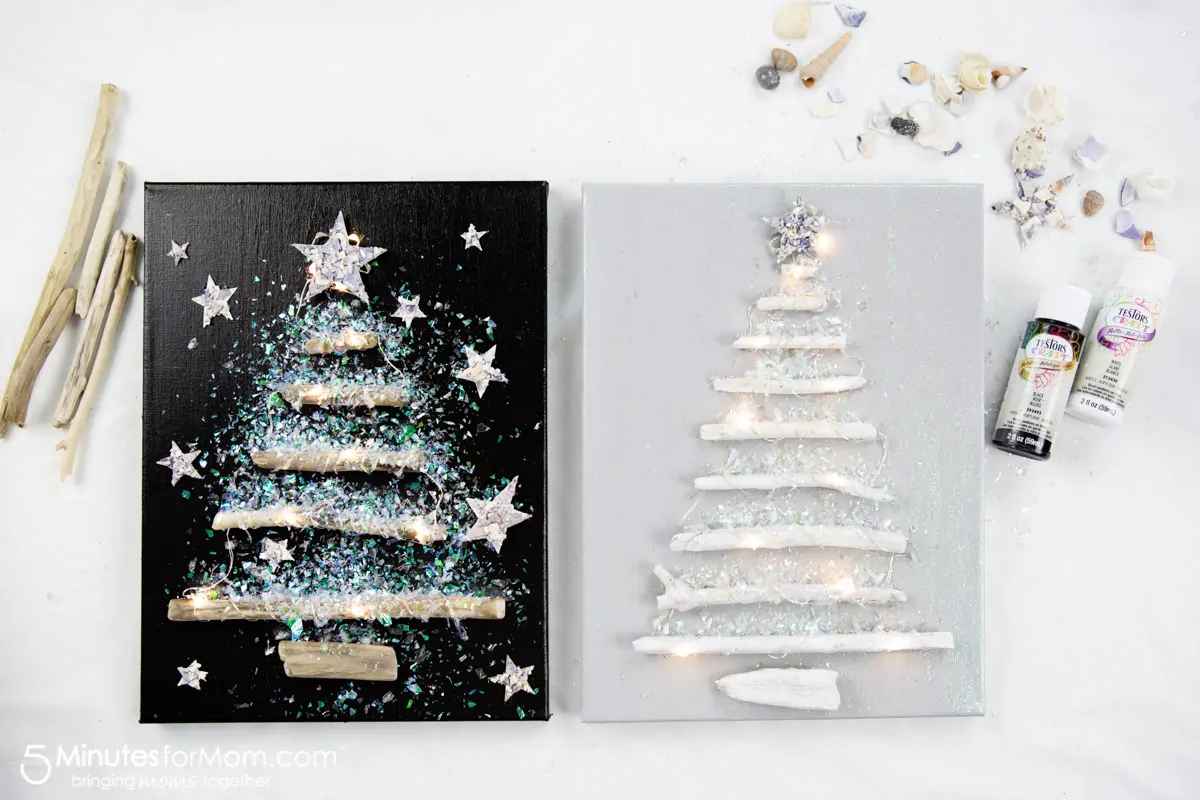
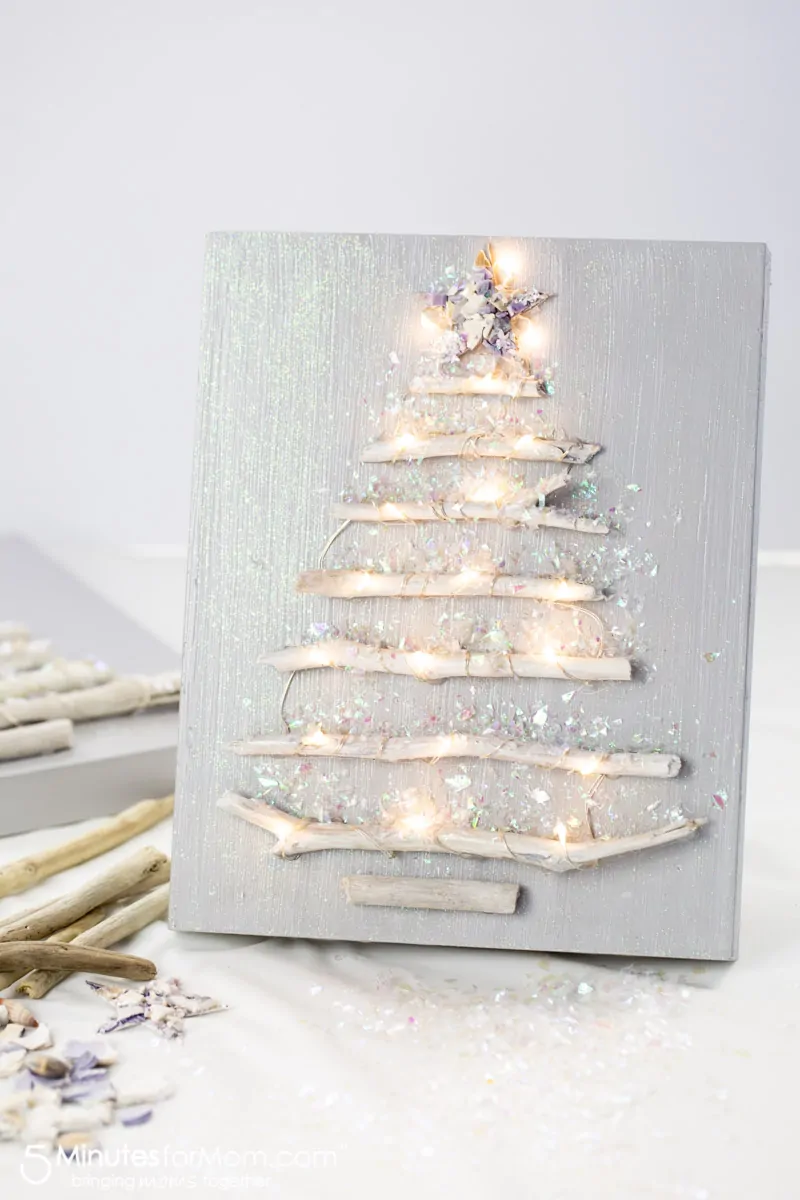
You can make your tree sparkle with Testors Intense Glitter and fairy lights…
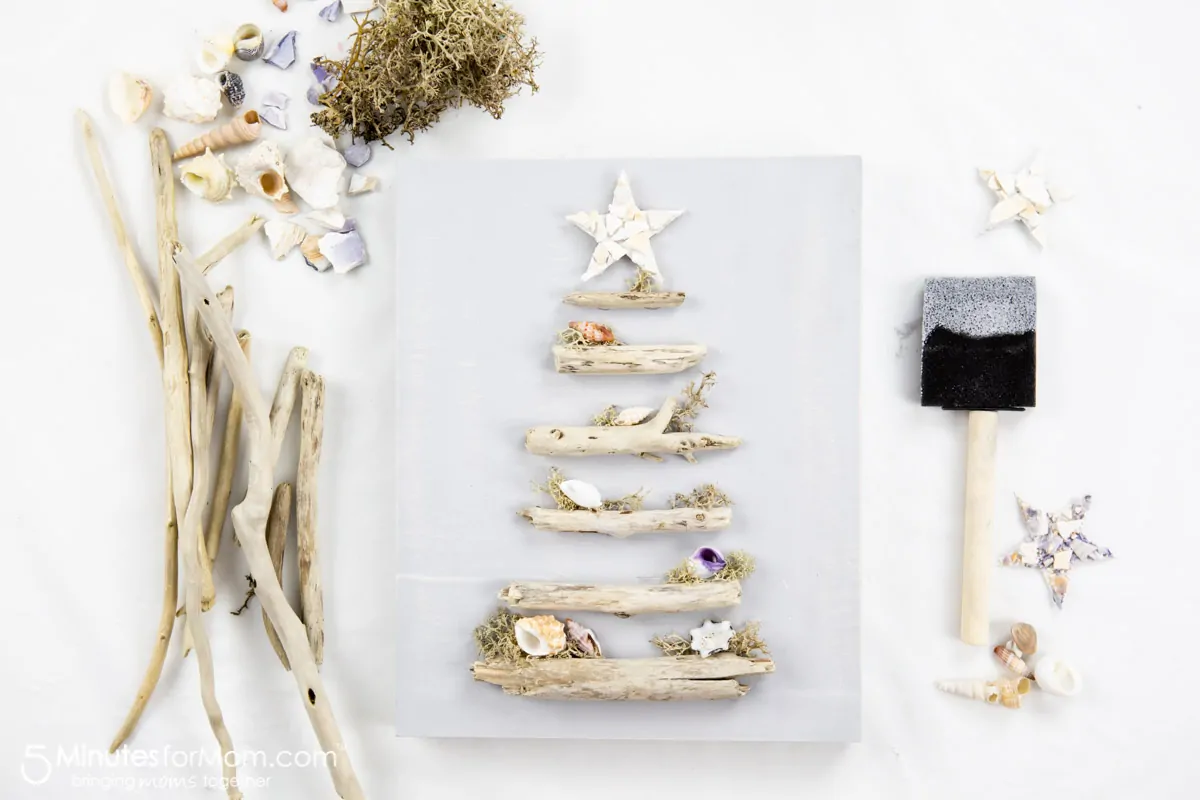
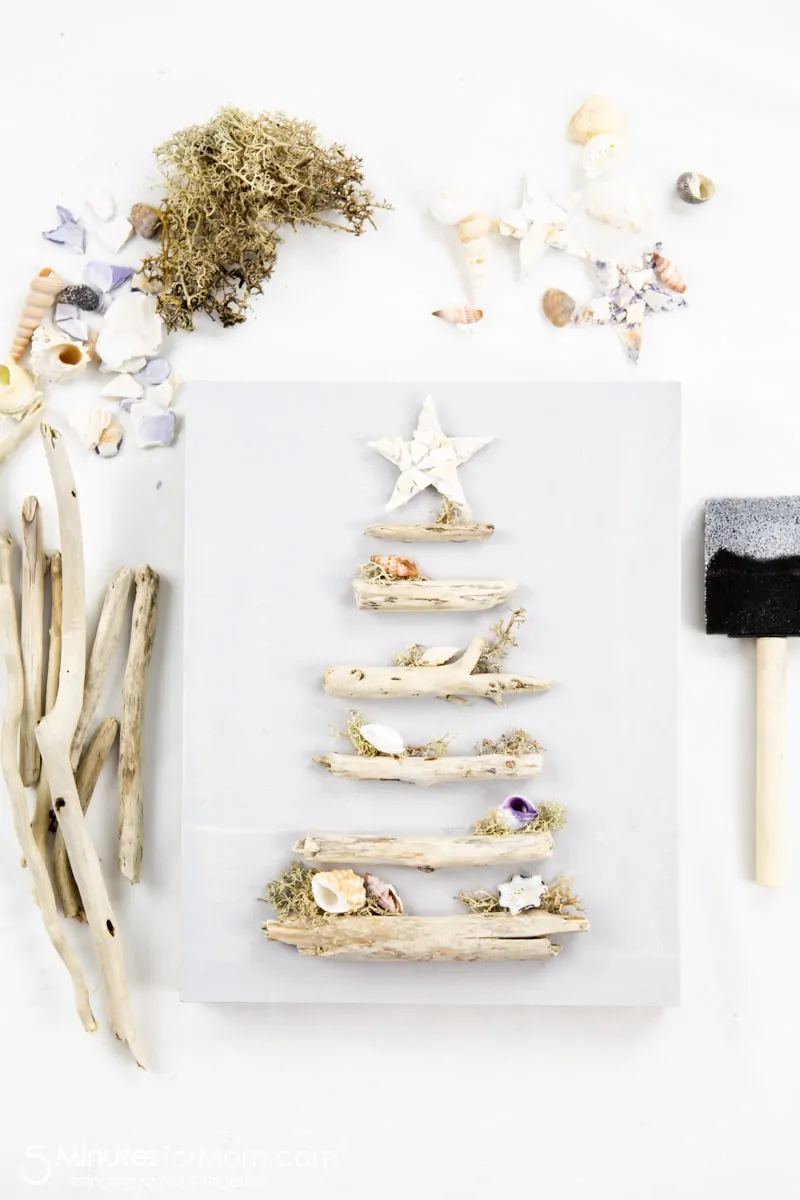
Or keep them natural and have a distressed chalk paint background as I did with my beach themed driftwood tree design…
The best part of this craft is you and your family and friends can decorate your Christmas trees however you want.
We used iridescent artificial snow, moss, shells, and even stars made with shells! (I also have an upcoming tutorial on making seashell mosaic star ornaments. I couldn’t fit it all in one post.)
You can make your Christmas tree art big or small, hang it on your wall, or display it on an easel. Anything goes for this art project — so let your creative ideas flow.
Driftwood Christmas Tree Craft
For our DIY Driftwood Christmas Trees we used:
- Testors Craft Intense Glitter in Iridescent
- Testors Craft Acrylic Paint in White, Black, and Hazy
- Rust-oleum Chalked Paint in Aged Gray
- Testors Craft
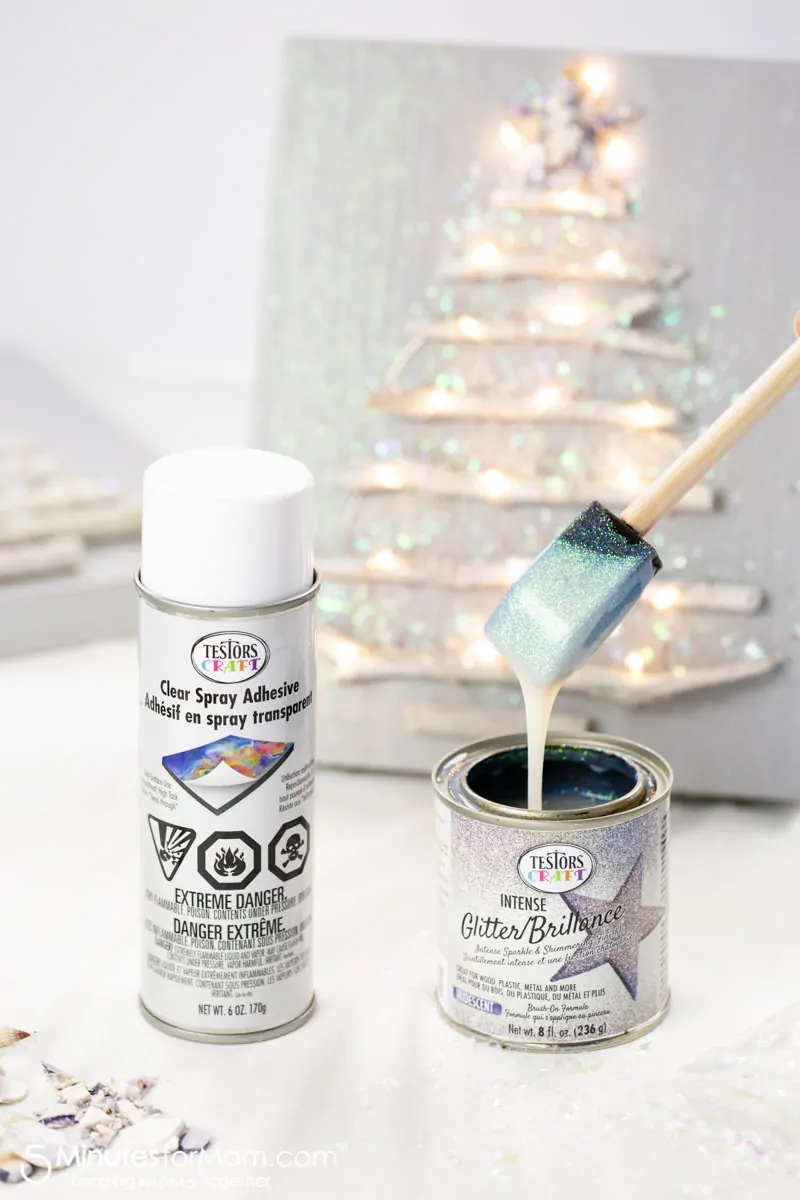
- Spray Adhesive
- Driftwood
- Canvases and wood plaques
- Decorations for our trees – shells, mosaic star ornaments that we made, moss, iridescent artificial snow, etc.
- Fairy Lights (7′ strands with warm white lights)
- Glue gun
- White glue
- Small drill/Dremel (only for the wood version – if you are using canvases, you do not need a drill)
- Sandpaper
- Paint brushes, foam brushes, craft sticks
- Reusable adhesive tac
- Foil dishes, cardboard, clean rag/cloth, paper towels, etc for our workspace
Step 1 — Wash and Dry Driftwood
After collecting your driftwood or sticks, you will probably want to give them a good cleaning.
To clean your driftwood, soak and scrub them in a bleach and water solution. You can soak them overnight, but I just soaked and scrubbed ours until I had removed the dirt and any remaining bark.
If you don’t want to use bleach, you can soak your driftwood or sticks in water with washing soda. Or, for a less caustic option, you can soak and scrub in saltwater or water with vinegar or lemon juice.
We allowed our driftwood to air dry for a few days with a fan blowing on them. If you are in a hurry, you can dry in a low-temperature oven (200*F) for a few hours. But, of course, please be careful that your sticks do not catch on fire.
Once your sticks are washed and dry, you can begin designing your Christmas Tree!
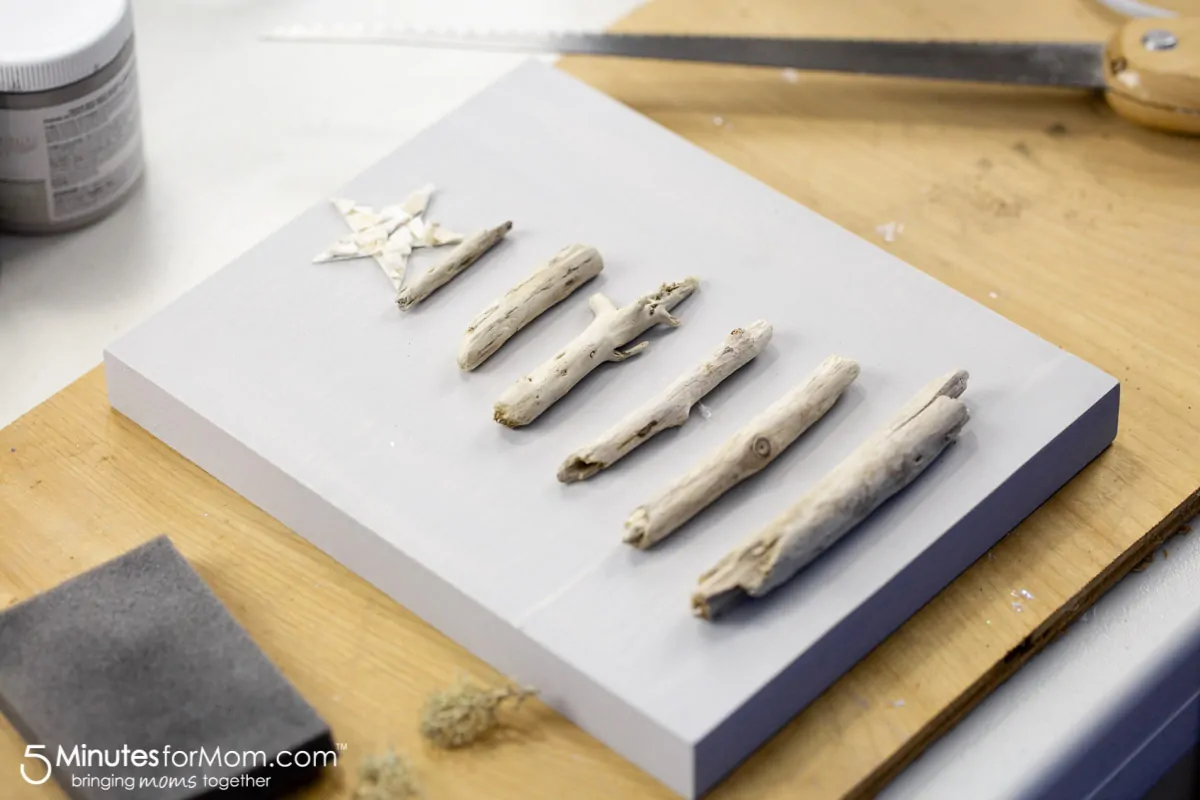
First, choose sticks that are the right size and shape to form a tree-shaped stick silhouette.
If you don’t have all the perfect lengths that you want, you may want to cut or break some sticks. I used a small saw to cut a couple of our thicker sticks.
You may also want to use some sandpaper to smooth any rough or jagged places on your driftwood or sticks.
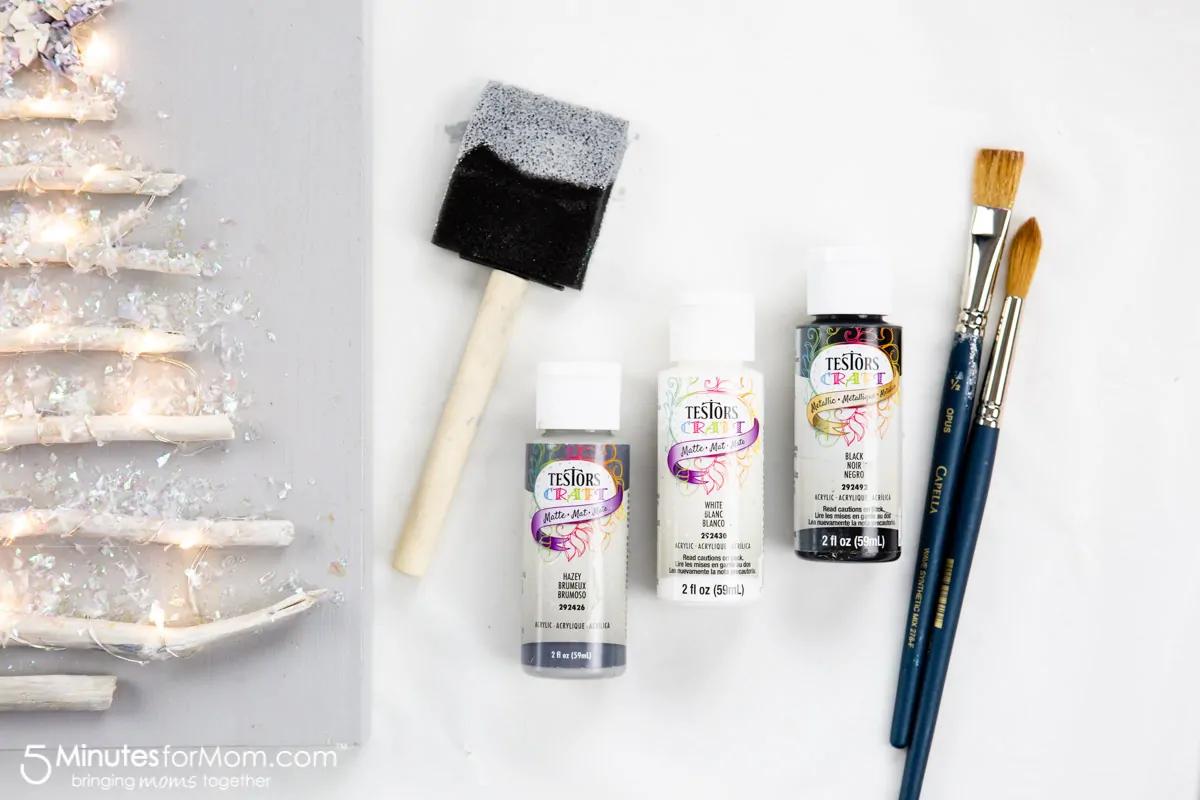
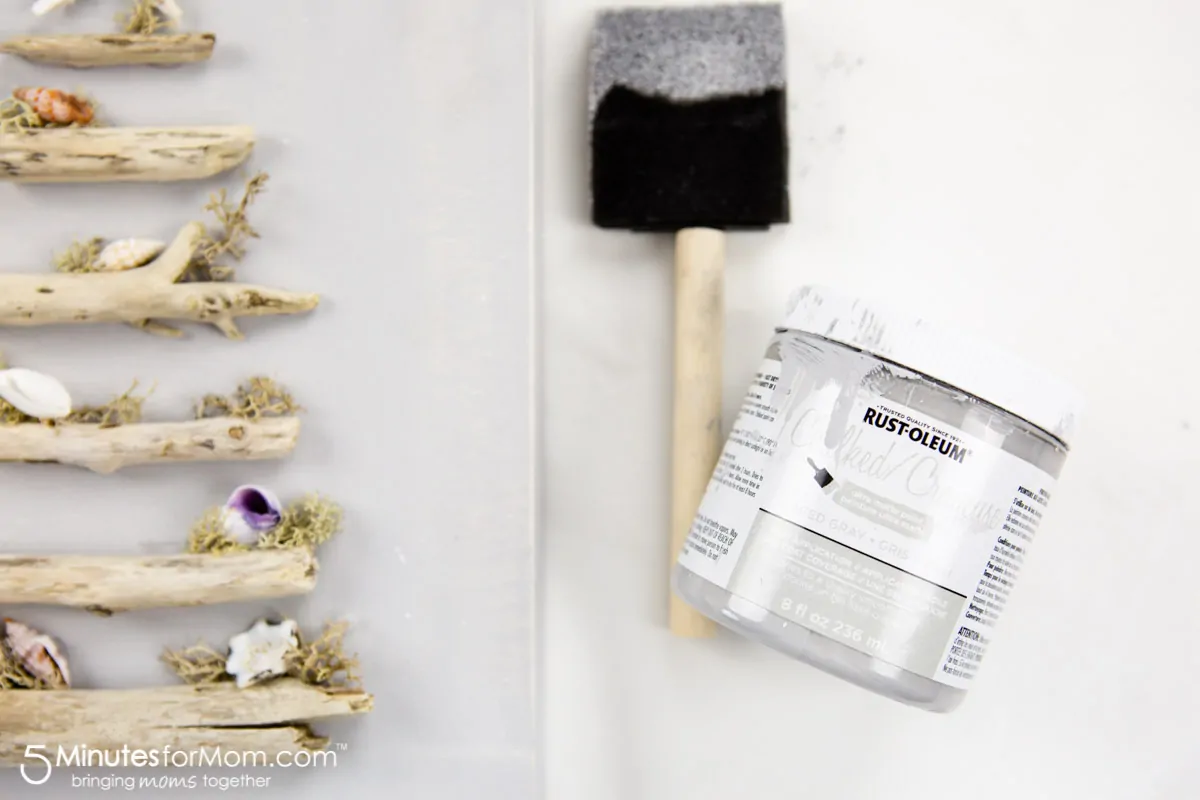
Step 2 — Paint Background
Paint your canvas and/or wood panel. You will probably want to make at least two coats.
You can use Testors Craft Acrylic Paint in the color of your choice.
Or if you want a more matte look, you can use Testors Aerosol Chalk Paint or Rust-oleum’s Chalked paint. I used Aged Gray.
To speed up the drying process, a hairdryer is a lifesaver.
If you want to create a distressed look, as I did for my beach-themed driftwood tree, gently sandpaper the surface of your paint once it is dry.
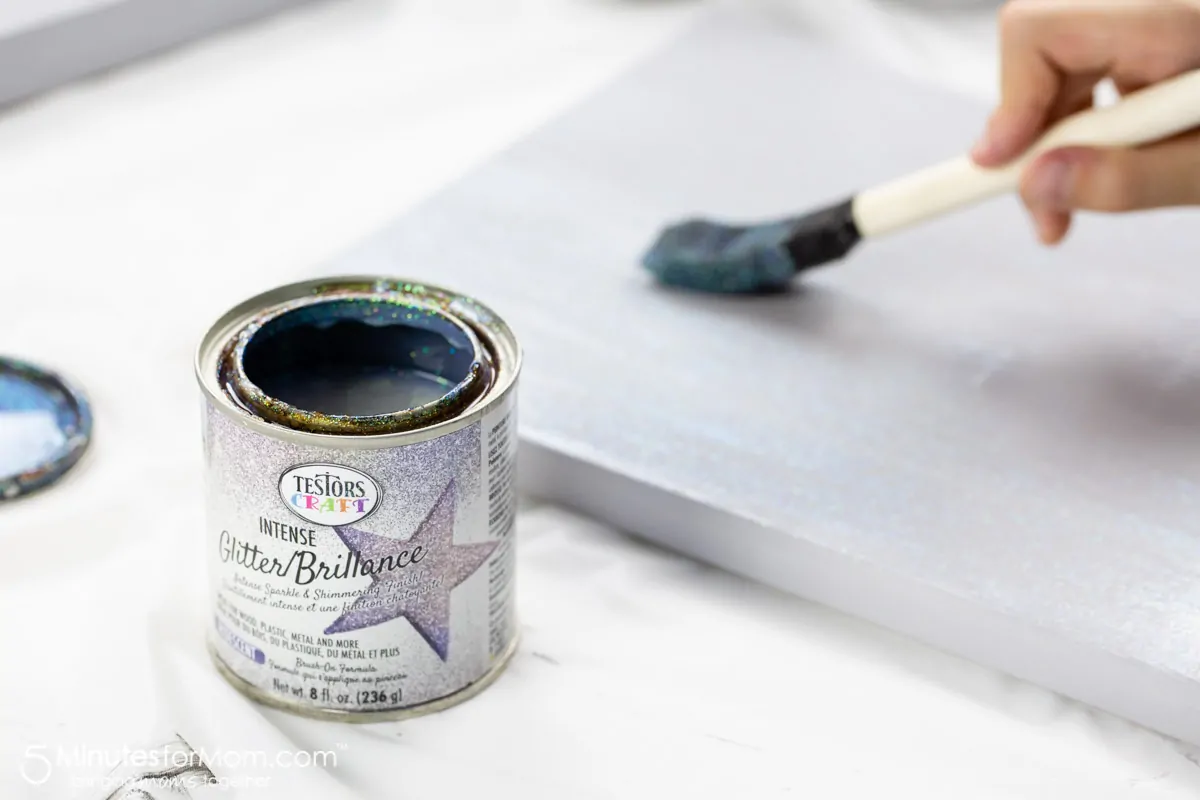
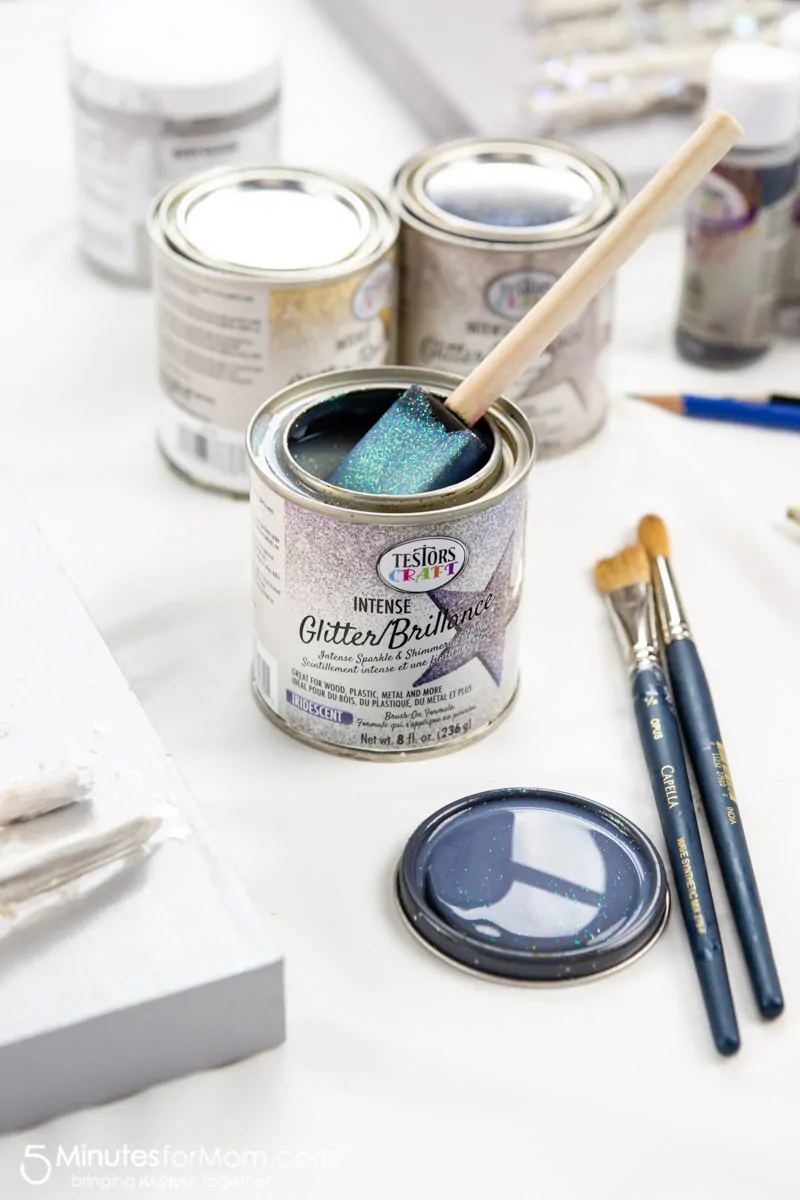
If you want a glittery look, apply one or two coats of Testors Craft Intense Glitter. We used Iridescent because our girls are obsessed with all things holographic. But the silver and gold are gorgeous too.
You can string your wood pieces together to form a tree and hang your design on a wall without an attached background. (I have made a large DIY Christmas Tree out of sticks for a Christmas photoshoot background.)
But for this Christmas Tree Craft, we choose to attach our driftwood trees to canvases and pieces of wood.
We used canvases and wood panel/plaques we bought at the dollar store.
The great thing about using canvases and/or wood panels is that they have a wood frame in the back where you can hide the battery pack from the fairy lights.
Step 3 — Paint Sticks
While your background is drying, paint your sticks.
If you want to keep the “driftwood” feel to your tree or enhance the faded driftwood effect, you can paint your sticks with a white-wash made with white paint and a bit of water.
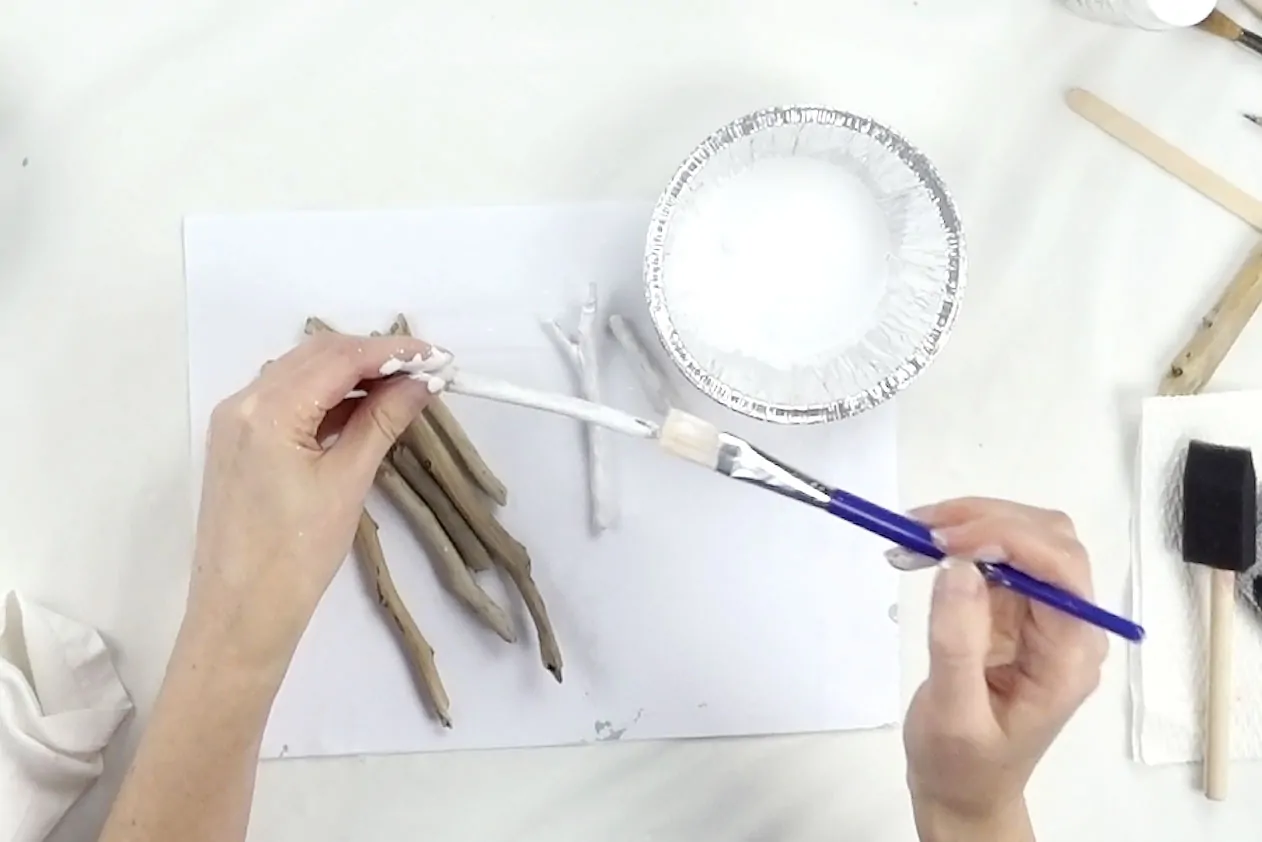
If you have sticks that are different colors or types of wood, whitewashing or painting your sticks can also help to create a more uniformed look.
To add extra shine and shimmer to your Christmas tree, you can also apply a coat or two of Testors Intense Glitter to your sticks. We liked the effect of the Intense Glitter best when we applied it to sticks that we had whitewashed or painted first.
Of course, you don’t need to paint your sticks. You can leave them as is. If you have washed or soaked them in a bleach solution, they will have a nice faded look to them already.
For my beach-themed distressed driftwood tree panel, I did not paint my driftwood. I left it natural.
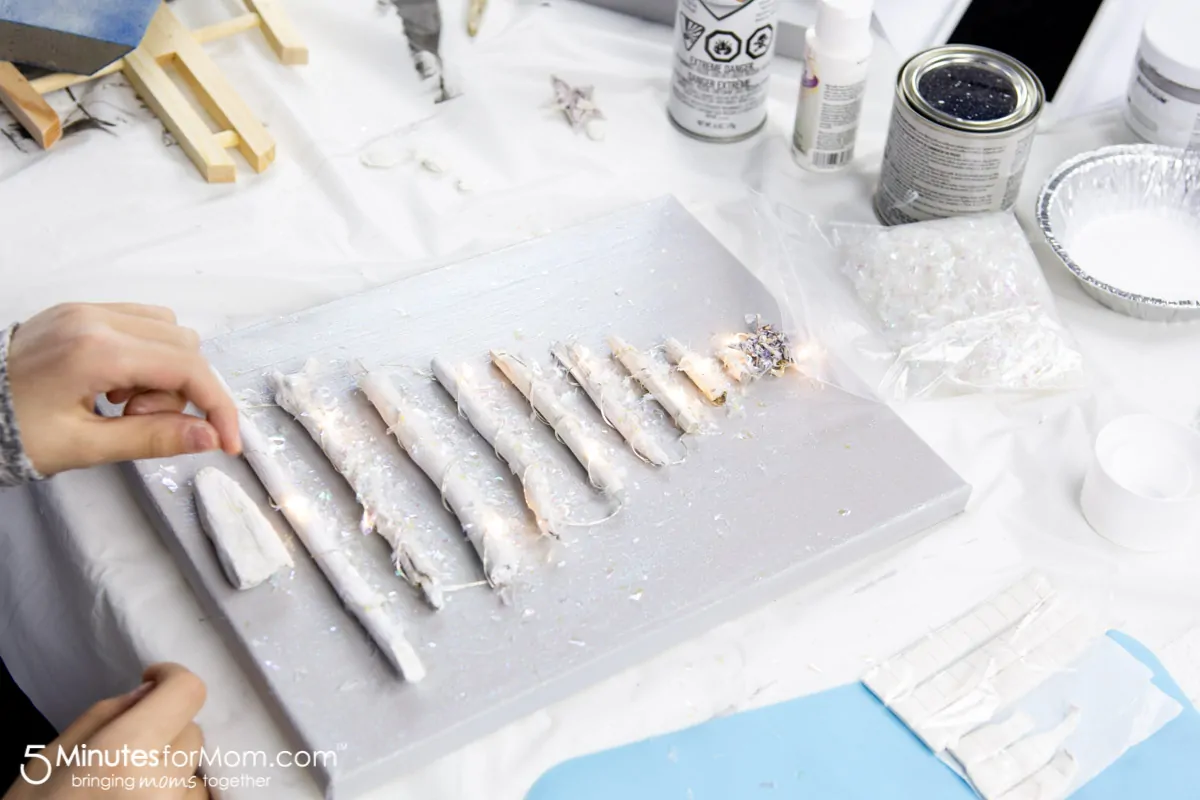
Step 4 — Tac Sticks to Background
Once everything is dry, arrange your sticks on your background. When you have a silhouette that you like, tac them in place with repositionable adhesive tac.
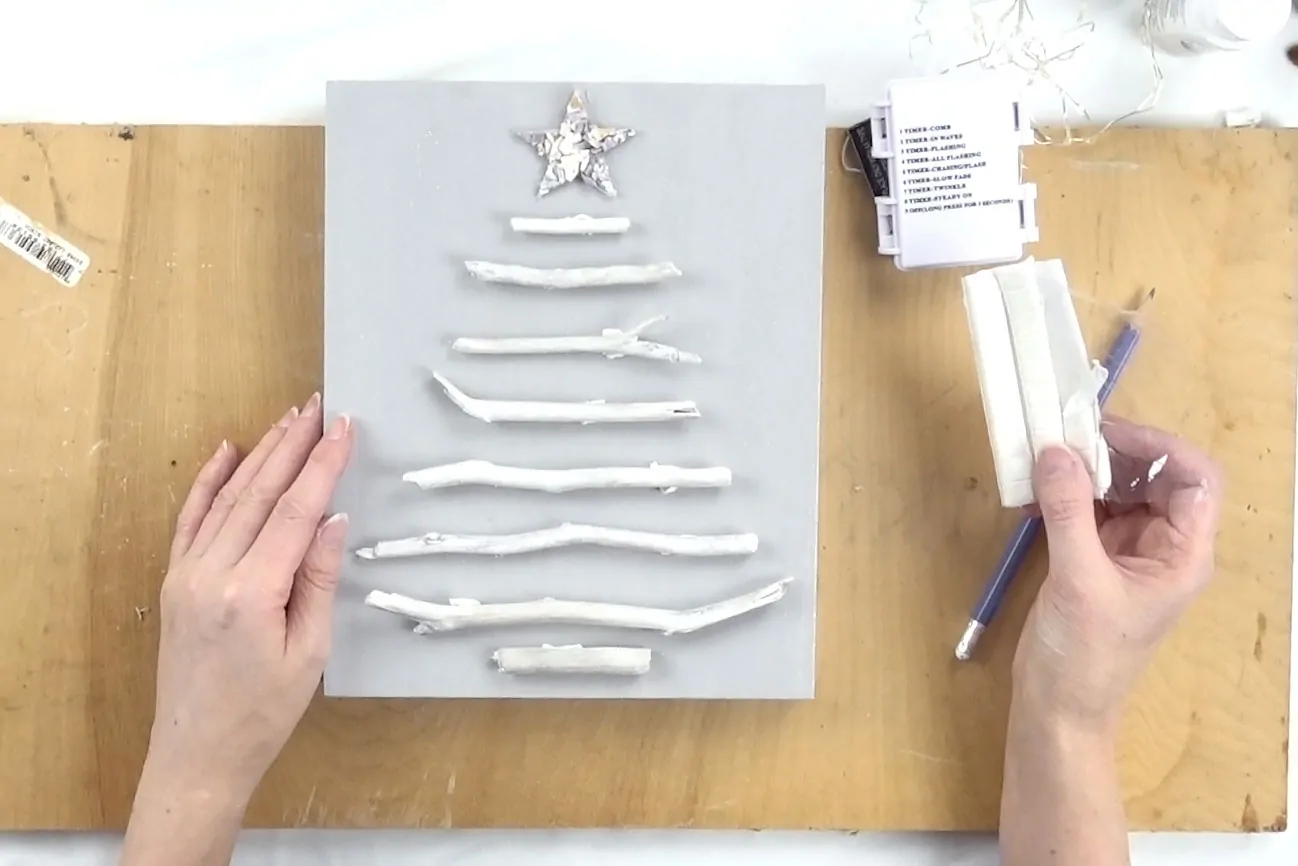
While you can skip this step if you don’t have any tac, it is very helpful to have your sticks tacked down in place while you arrange your fairy lights and begin to hot glue your sticks in place.
Step 5 — Make a Hole in Background
If you are adding fairy lights to your Christmas Tree, make a hole behind the stick on the bottom row of your tree.
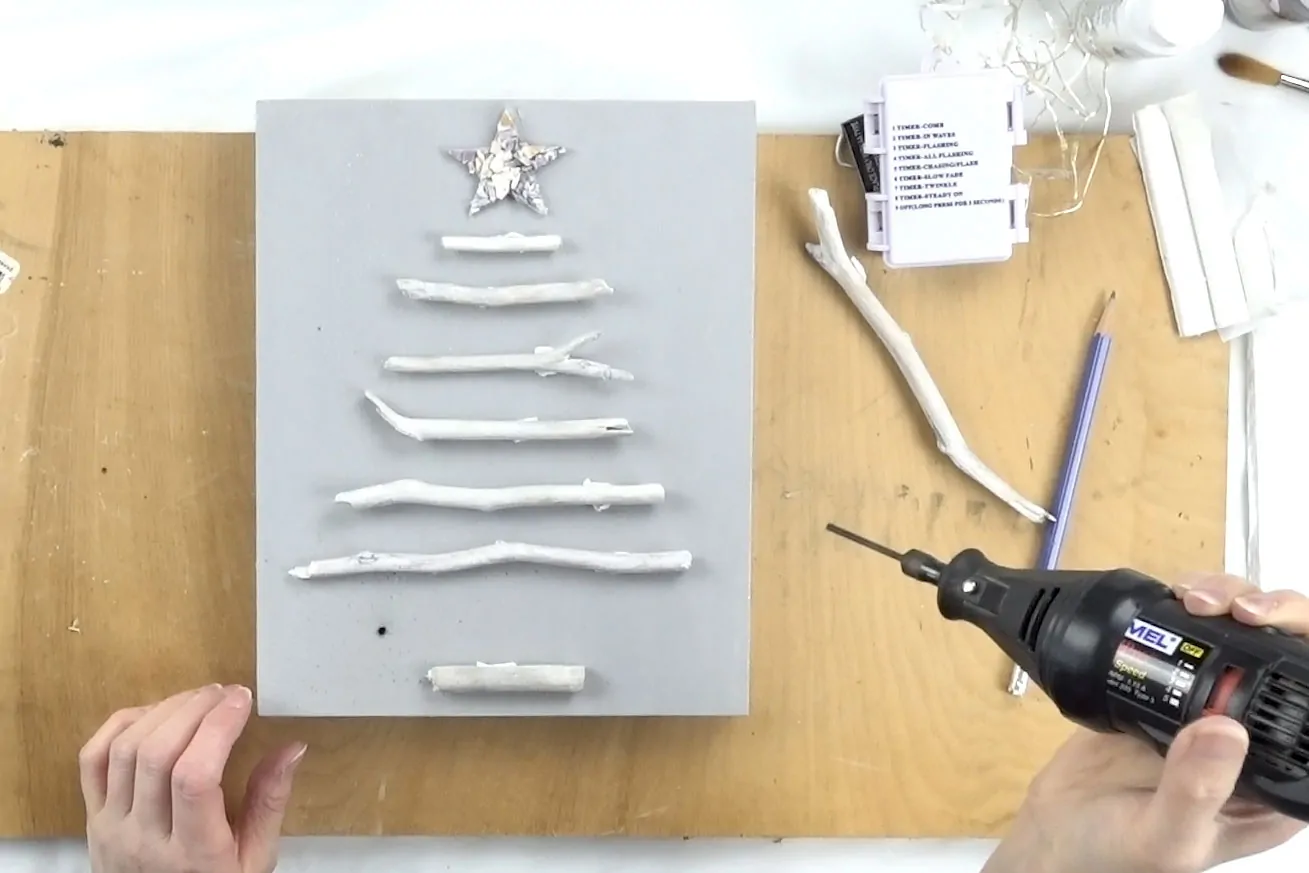
On a canvas, you can simply poke a hole with a pencil. On a piece of wood, you will need a bit more force such as a small drill. I used a Dremel to create the holes in our wood panels.
Step 6 — Add Fairy Lights
While you can string your fairy lights on to your driftwood or sticks as you hot glue them in place, I prefer to string my fairy lights loosely around my driftwood first, holding the strings and the sticks in place with tac as I go.
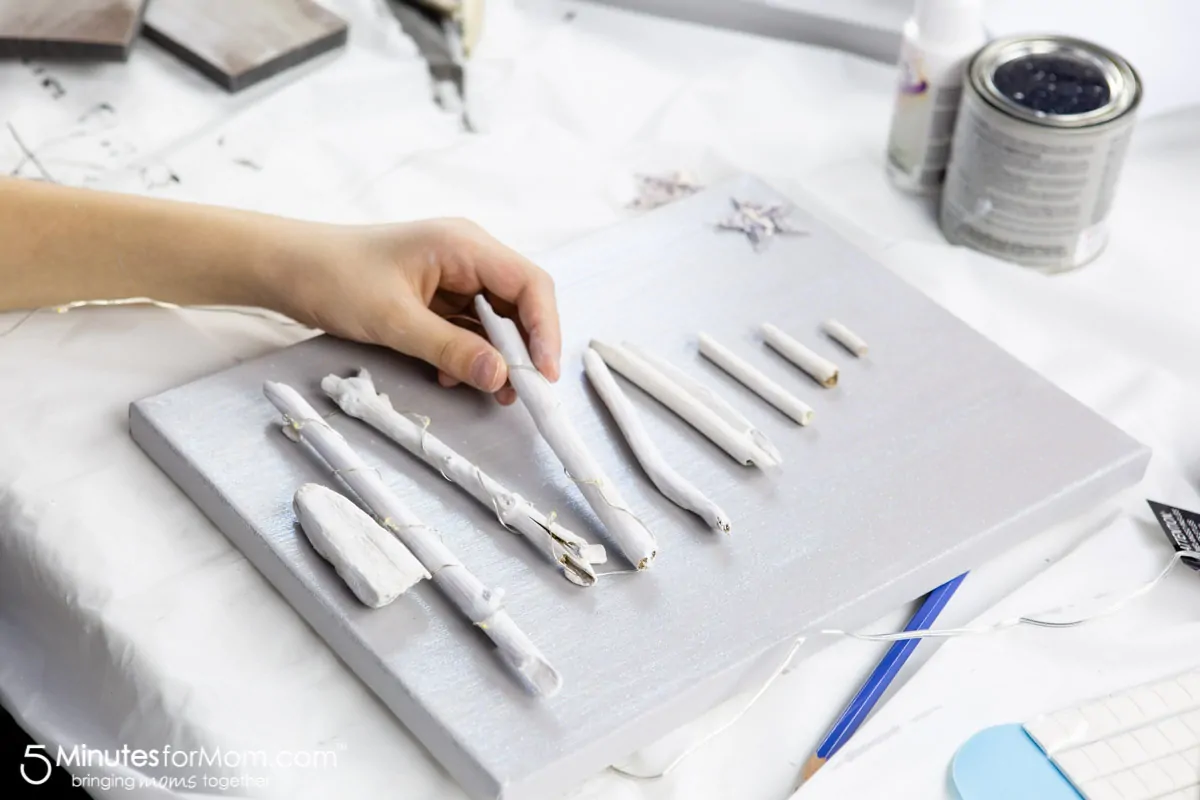
This way, I can ensure that I have spaced out my lights well and that I have enough lights to make it to the top of the tree.
I used the last few lights on the string of fairy lights to light up my star. I made a tangled little pile of wires behind the star, positioning the lights to show off the star.
If your string of lights is too long and you have more lights than you can use on your tree, you can simply make another hole behind the star and thread the excess through to the back.
Step 7 — Glue Sticks in Place
Once you are happy with your layout of sticks and lights, you can fire up your glue gun and start hot gluing them in place.
If you used tac to keep everything in place while you worked, remove the tac as you hot glue.
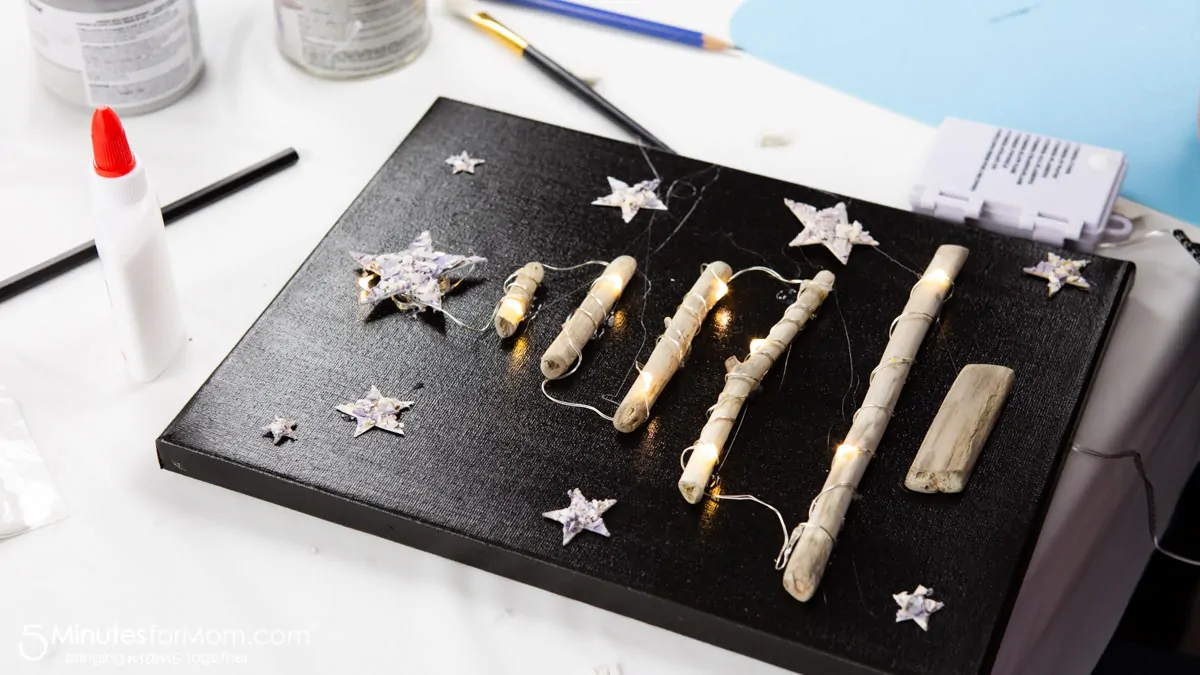
Step 8 — Decorate Your Tree
Yay — you have built your tree! Now comes the fun of decorating it.
You can get as creative as you want with your tree decorations.
We used iridescent artificial snow, moss, shells, and even stars made with shells! (Check out our upcoming tutorial on making seashell mosaic star ornaments.)
To apply the artificial snow, we used Testors Craft Spray Adhesive. It worked perfectly!
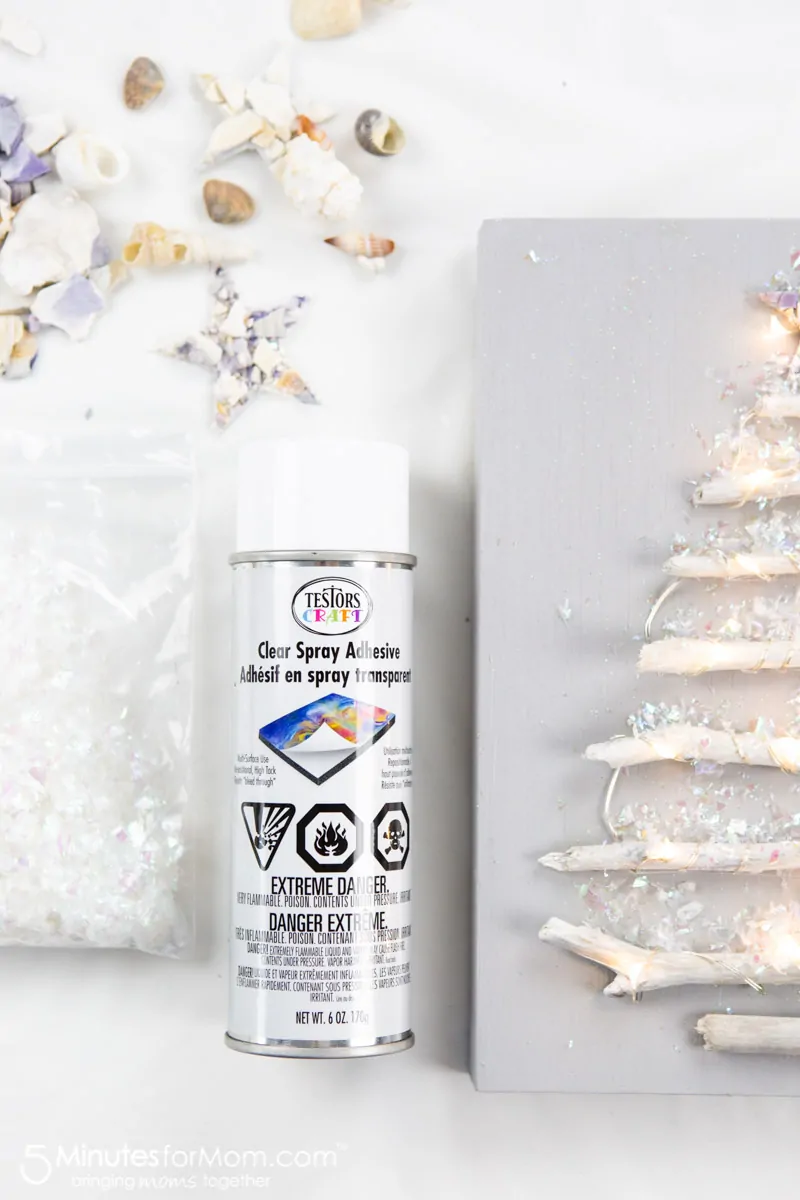
We sprayed our tree branches and then let it snow down on them with the iridescent snow we bought at the dollar store.
Please note that you will want to spray the adhesive in a well-ventilated area such as an open garage or even outside.
There you go! Your beautiful trees are complete!
You can display them on easels, hang them on the wall, add them to your Christmas decor on a mantel or shelf.
And if like us, you have so much fun making these Christmas Tree crafts that you can’t stop making them, these driftwood trees are perfect to give as holiday gifts to teachers, coaches, friends or family.
If you are looking for more fun Christmas craft ideas, check out some of our favorite Testors projects…
- How To Paint Christmas Ornaments
- How to Paint Rocks for the Holidays
- How to Make a Handmade Breakfast Tray
- How to Make a DIY Pallet Photo Frame
- How to Airbrush Personalized Shirts for Kids
- Get Outside And Play With Spray Chalk
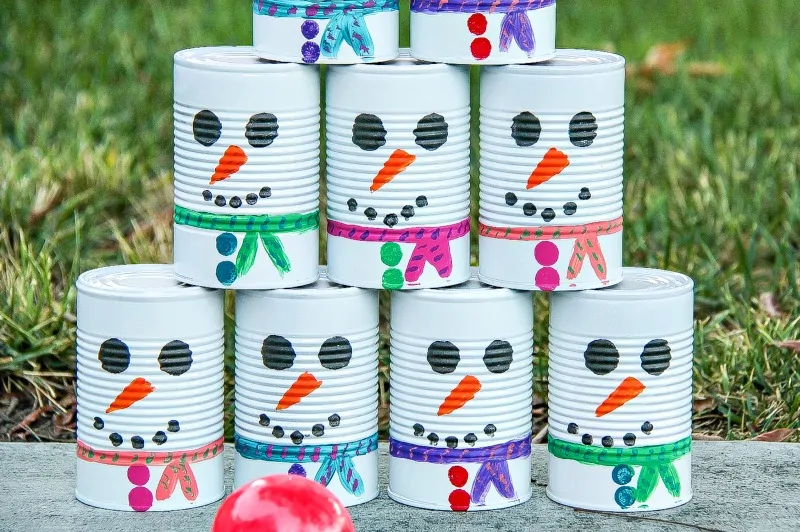
- DIY Snowman Tin Can Toss
- How to Paint Gaming Controllers
Pin it for Later
Disclosure: This post is sponsored by Testors. Thanks for reading and sharing.
Written by Janice Croze, co-founder of 5 Minutes for Mom
Talk with me: @5minutesformom and Facebook.com/5minutesformom
Pin with me at pinterest.com/5minutesformom
More Christmas Crafts
How To Paint Christmas Ornaments

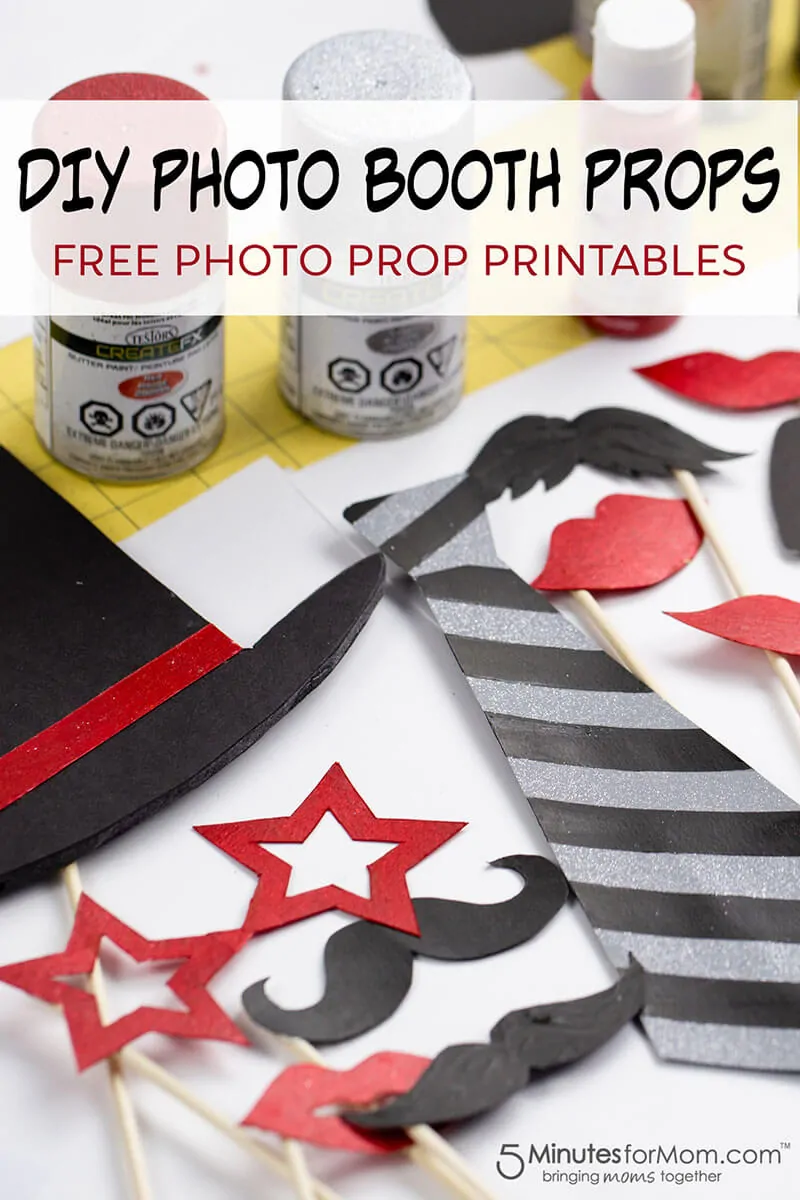
DIY New Year’s Eve Photo Booth Props

I’d go with a beach theme for myself although I think those would be fun to personalize for my kids based on their interests….in which case one would have Mickey mouse theme and one would be paw patrol
I’d love to create a beach themed craft. It would look really nice in my daughter’s room.
I would do the background silver, star on top gold, branches green, dots of color for balls, and white fairy lights. Not Beach for this one.
I would love to make a beach theme with fairy lightsðŸ˜
I spend new years eve celebrating my son’s Birthday and ringing in the new year with our family♡
i love th ebeach so i would do the beach theme with blue backgorund and lights thanks
I would decorate it with baby pine cones, tiny ornaments, and lights.
I love the snow scene, with a white background, and with lights!
I like the look with the black background and the fairy lights….I’d probably add some tiny origami ornaments to it too! And glitter! I love glitter! Thanks and God bless!
I would love to do a cozy type of scene. Fairy lights would definitely help that theme.
Since we have a lot of sea shells I would do a beach winter scene and add some holly berries to it.
I’d add bright colors. I love bright colors
a snow theme or a woodsy theme
I would add snow & sequins.
I would attach plastic gems to the branches and string them with sequin garlands.
I would do a beach scene with a bit of sparkle because the world is a better place when it sparkles.
I’d do a snow theme. I’d add silver glitter & white lights.
I would have a red background with a green tree and add lights.
I would do the snow theme! I may add some twinkling lights and a deer silhouette to match my house decor. This giveaway is awesome, thanks!
Think I would try a beach theme.
I would use fairy lights with a snow theme and silver accents
Love this. You are my pick for “favorite” on Waste Not Wednesday this week
I would do a beach theme with shells.
We live in the mountains so I can imagine following your instructions but with sticks from trees around here and maybe tiny pine cones.
I loved the beach scene and how you propped beach items onto the sticks. Its a nice way to remember a vacation at the beach.
I would do a beach scene and use lots of blues and white and add a few sea shells as well.
I would do a dark background with lots of bright lights and color
I would do a silver and gold snowflake background
I would do a silver background with some light blue throughout it as well. I would have fairy lights. There would be ornaments on the tree and there would be presents under the tree. And the most important would be a beautiful sparkling angel on top.
I would do snow and a blue background.
I would go with blue and silver. Maybe some fantasy elements thrown in.
This looks like such a fun project to do with my teenager! I would love the light colored background and the winter tree with the lights! I like how you can customize it so many ways!
This is super cute! I really love driftwood crafts and had a huge stash of driftwood when we lived in Hawaii. I need to gather up some more!
I’d most certainly create a beach theme for sure. I live for the beach and it makes me joyful. Color background maybe a light yellow or blue. I would add seashells and even a palm tree since I love them. I’d have to look at other creative ideas as well.
I would decorate with lights & angels with a silver background.
Since we usually have snow by Christmas I’d do a snow theme and use lots of white glitter.
Teal background, with lights, white branches… fun!
I’d make my tree red and teal for my kitchen!
I would do a snowman theme with a medium to dark blue back ground and I would absolutely use fairy lights.
snow and fairy lights
I love the beach theme idea but would probably try a crimson background with a green tree and add ornaments in different colors. Lights would be a necessity!
I would do the grey back with white glitter and then mimi lights . I love this so cute
I would do a pink fairy theme with fairy lights for my niece’s bedroom.
What fun … I love all the cool stuff wow
I absolutely love the gray background. Yes to the lights. Very pretty!!
I would decorate it with candies or dried fruit as garland and little pine cones as ornaments
Have an umbre going from light blue to light pale green. With snow and glitter. With a shadow of Mary, Joseph and the infant Christ (our Savior).
Snow theme with a gray background and of course, fairy lights!!!
I would have a darker background with the fairy lights, so they stand out more. And I would definitely be using glitter!
I would do the snow theme with fairy lights and a blue background
This is the cutest! Very creative idea that even the kids would enjoy making. #WinedDownWednesday
I’d do the winter theme, with fairy lights and tiny birdhouses and birds.
I would do a winter scene with snow on top the Christmas tree.
I would add little shells & small sand. Also maybe some little pearl looking pieces. Beach theme all the way
I would maybe put tiny ornaments.
MIne wouldcertainly be a snow theme on a midnight blue background with fairy lights
Very beautiful craft. I’d probably use a pale green background. Add a couple red berries on some if the branches. Maybe a mini pinecone or 2. And a little bit of snow here and there.
I would use white glitter
With a splash of silver to accent.
How clever! I really liked the one with the shells. I spend a lot of time at the coast so anything beachy gets my attention.
I would do a northern lights background with snowflakes coming down and glitter! Gotta have glitter!! It will be beautiful with lights and glitter…bright and shiny 🤗
I would do an all white snow theme. White background with white sticks, white lights and sparkles. Some white Sparkly or shiny snowflakes. Instead of the star I would do a big snowflake!
I like the snow and light idea because we live in Florida. Snow is just a distant dream for my kids.
I’d use cinnamon sticks between driftwood to fill it out more and add star anise and other spices to make it smell amazing (I work with the blind so extra sensory material is super important).
What a fun project! WE live in San Diego so I’d love to do a beach themed tree. I think id a a dark blue background so the snow would really show up.
I’d do snow and use fairy lights!!
I love the snowy lighted one you did, I think I would try to make one similar to that, but then I might do a red and green one, red for the background and green (a more light green) for the tree. Lights and glitter included of course. Love the idea.
I am loving the glittery one with lights on it! I would hang it in my bedroom!
I would do a snow background with lights.
The theme would be a beach since I love the beach and summer. Blue and silver.
I’d do a snow theme with a blue background and those tiny little Christmas bulbs
May have to make a trip to the Oregon Coast to get driftwood, but it’s all good.
What a fun Christmas tree craft. I would do a winter theme with snow, fairy lights, and a tiny red cardinals.
How pretty! You all are so creative. My girls would love this.