Have you ever taken a photo of a wonderful moment and then felt disappointed that it didn’t turn out as fabulously as you thought it would? If so, Alishia Osborn, from Just Leesha, is here to show how you can transform an ordinary picture into a dream with this Photoshop tutorial…
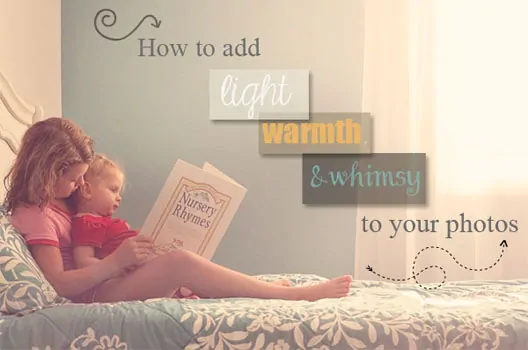

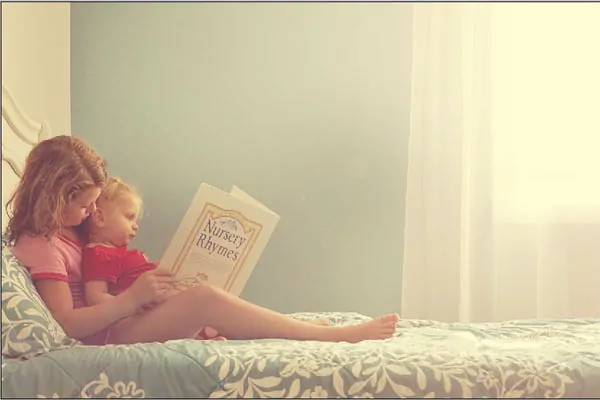
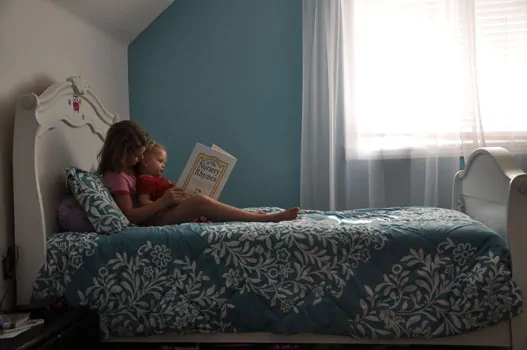
I recently took a photo of my daughters reading together that I just loved.
But… I didn’t love the lighting.
The straight out of camera shot was dark and dreary and didn’t lend itself to the moment I felt when I took it.
Thankfully, I had a little bit of light from the window… but it certainly needed some help.
That’s where Photoshop comes in!
This tutorial will show you how I fixed my dark photo…

…and made it light, warm and whimsical.
Let’s get started!
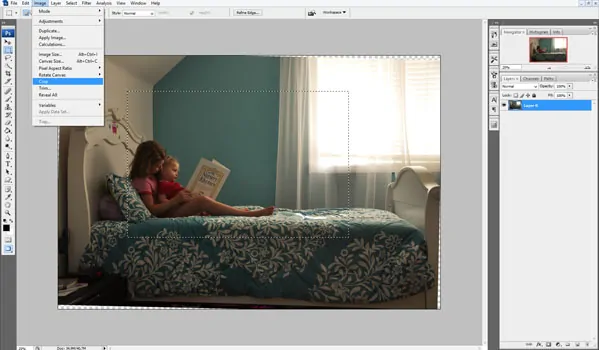
My first step was to straighten out my photo and crop it down.
I wanted to focus more on my girls and not have any distractions from the mess and large bed.
So I grabbed the ‘Rectangular Marque Tool’ and drew around the part of the photo I wanted to keep and cropped away!
Once I cropped my image, I ran an action called Clean Edit by Greater Than Gatsby.
They offer great free actions and I encourage you to try them out.
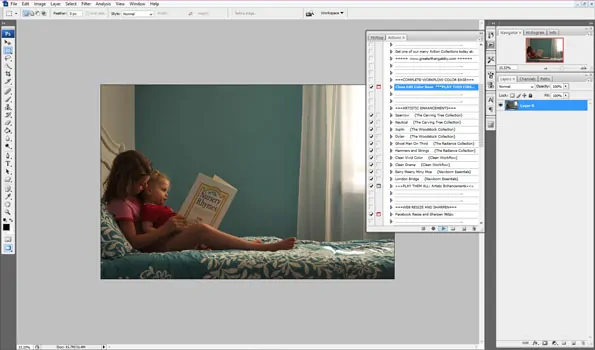
After the Clean Edit action, I had a new group folder above my background layer.
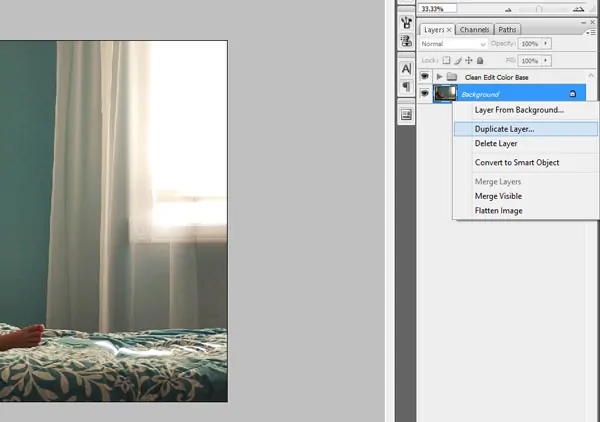
In order to keep things organized I always merge my folders into a new layer.
So I duplicated my background: <right click background <duplicate layer.
Once I had a new layer, I merged my Clean Edit photo with it.
<right click new layer <merge visible
(Make sure you uncheck the ‘eye’ on your background layer before you merge, or you will end up merging ALL layers. See red arrow)
For lack of a better title, I name it Merged.
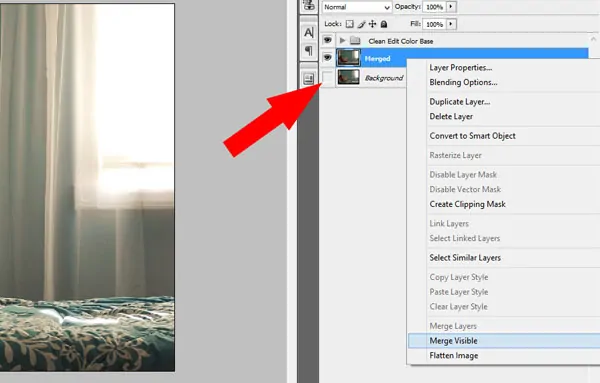
Now I have a Merged layer and a Background.
Next I decided to add more light.
I wanted a new layer to work on, so I duplicated the Merged layer, (named it Lens Flare, I’m real original I tell ya!) and added a Lens Flare to it.
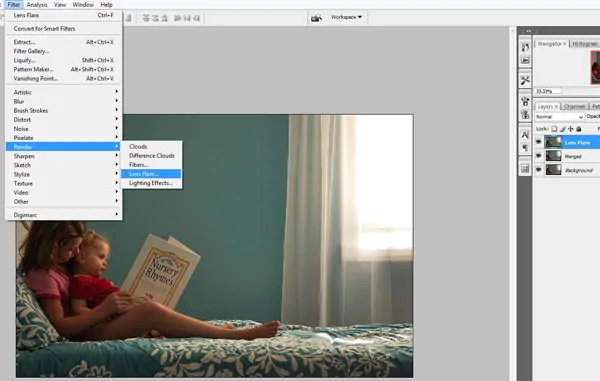
I used the ’50-330mm Lens Flare’ option and made sure the source of the flare came from the light from the window.
In other words, when placing my flare I made sure it started in the upper right hand corner.
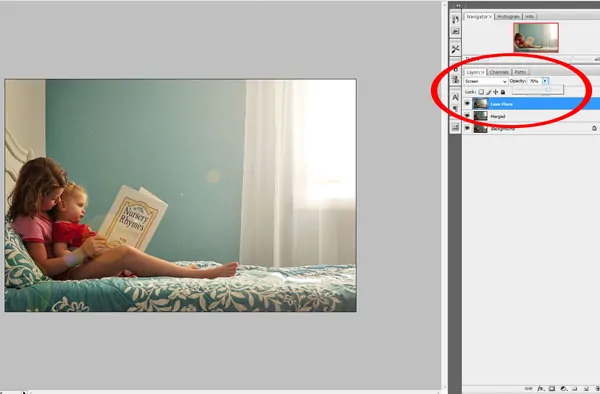
Lens Flare can look pretty wild when you first open it, but remember you can always tone it down by adjusting the opacity once it’s added.
So go crazy and tone it down later!
As you can see below, I also selected ‘Screen’ from the drop down menu instead of ‘Normal’.
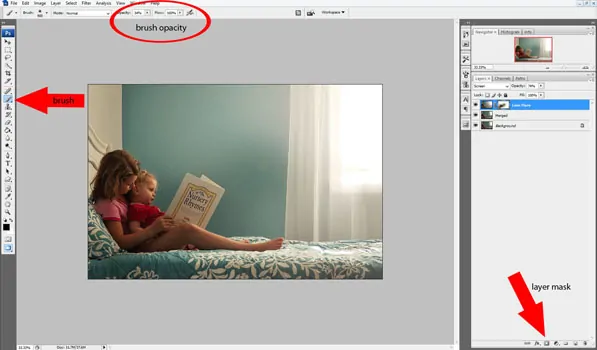
Next, I like to get rid of the more obvious light globes.
To me, they make the flare look fake, so I added a layer mask to the Lens Flare layer (say that tens times fast) and brushed them away.
Once I got the flare how I like it, I ran one of my favorite Actions from Florabella called Milk and Honey.
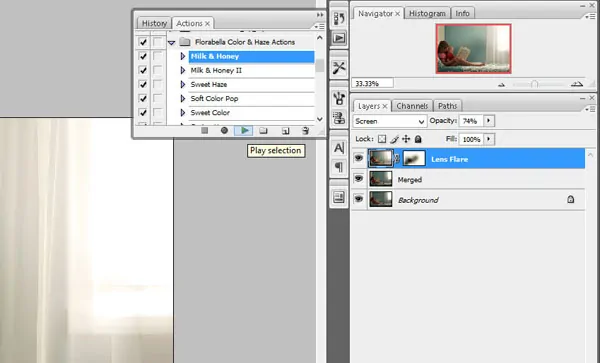
See how soft that Action makes the image?
That’s one of the reason’s why I like it so much!
I loved the result, but I felt the photo needed to be warmed up a bit. So I added a ‘Photo Filter’.
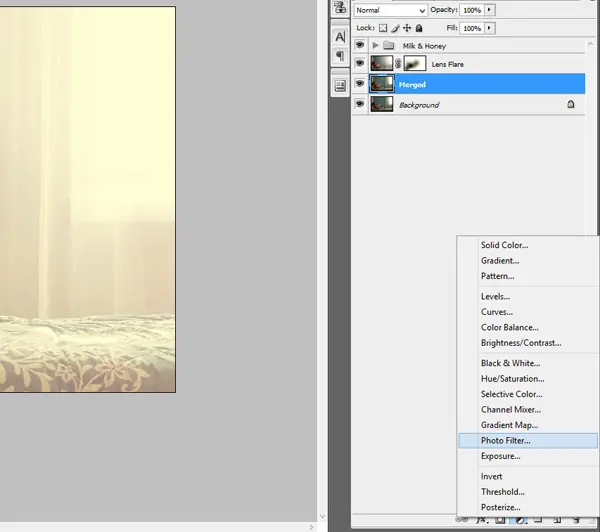
This time around I used ‘Warming Filter 85’ at 25% density.
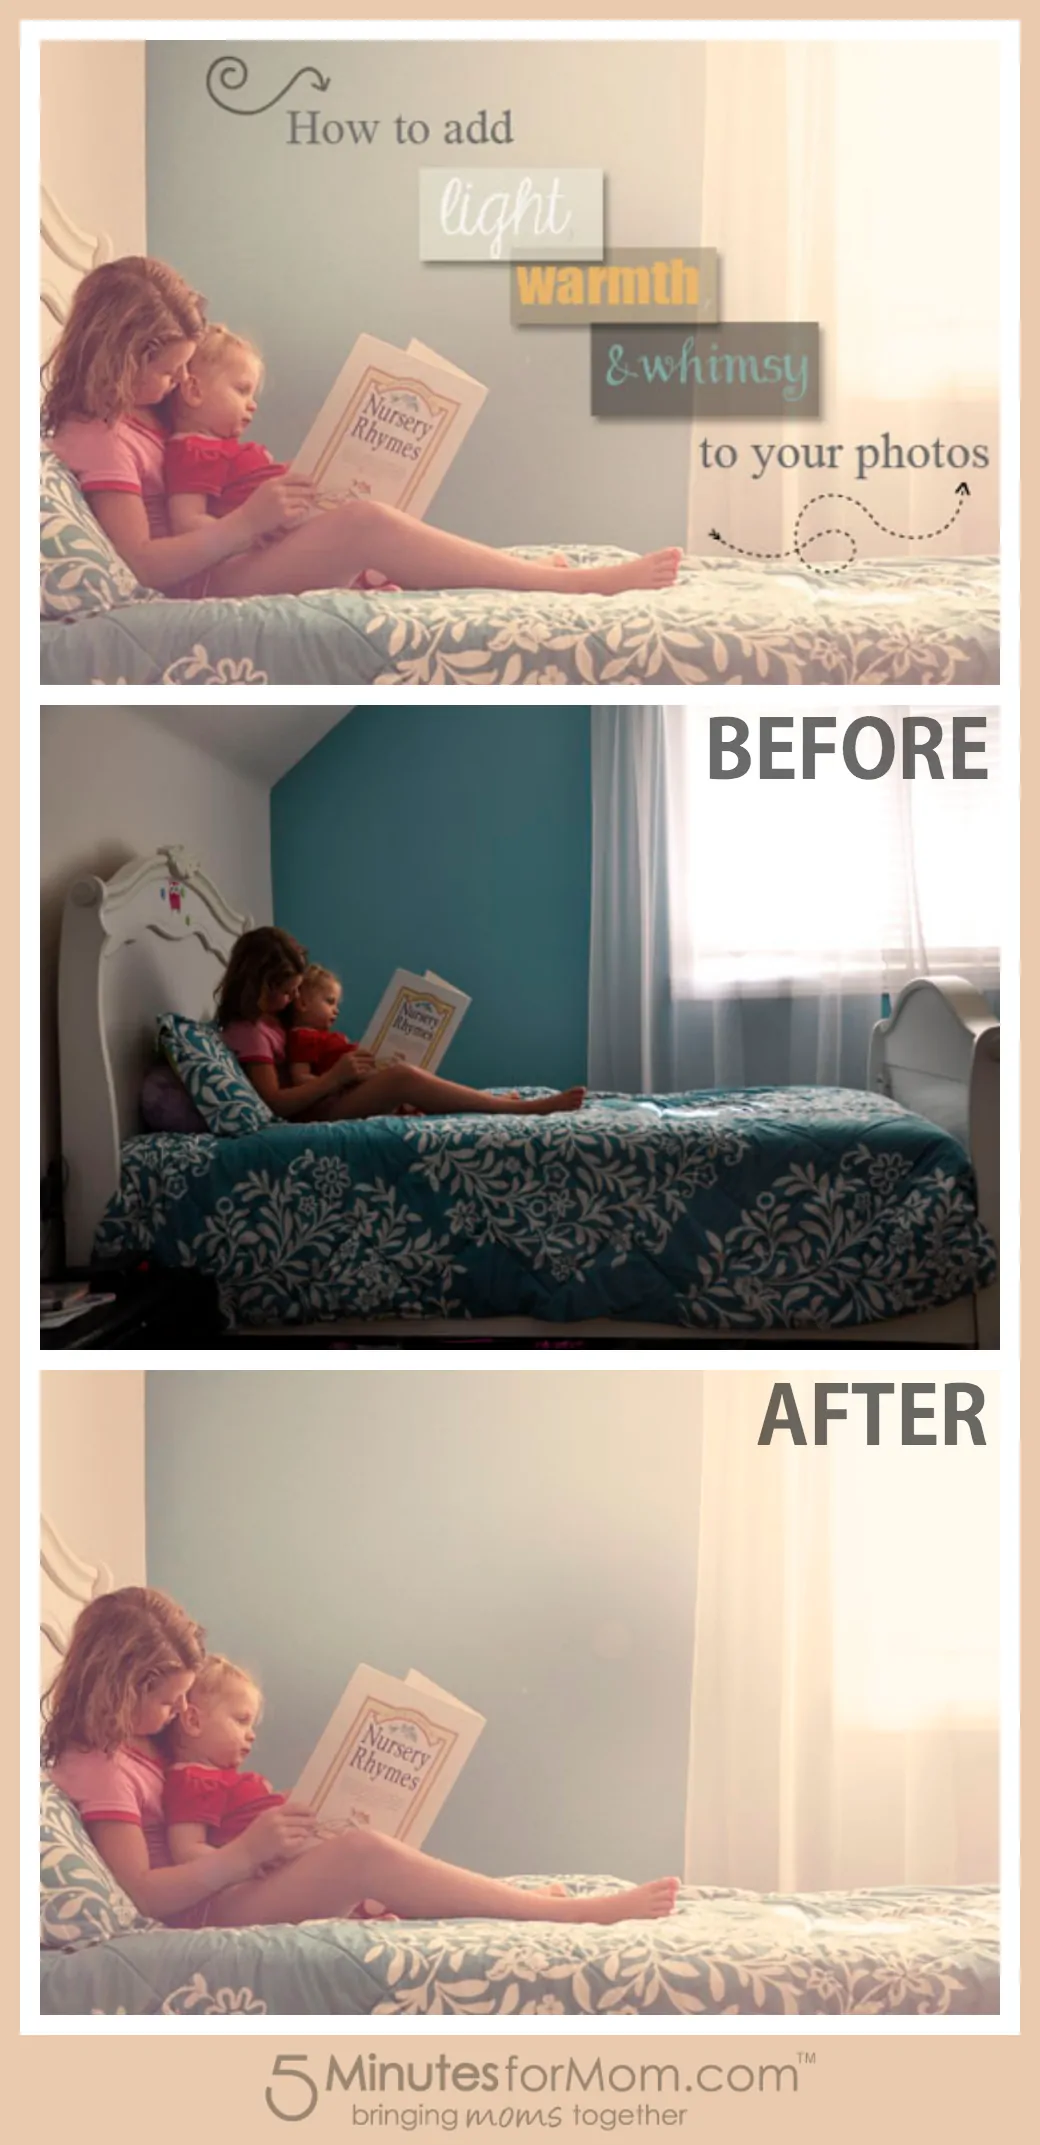
And this is my final result:
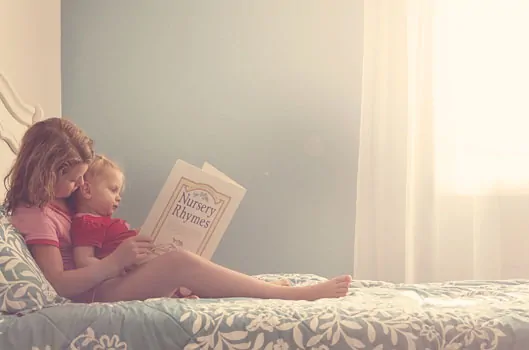
Remember what we started with?
Not bad for a little time spent editing!
To see more examples where I used this lighting trick check out these posts:
For more Photoshop tutorials and photography tips, please visit my site www.justleesha.com.
Pin It For Later
Make sure you pin this helpful post – Click Here To Repin or use the Pin It button below the image.
Written by Alishia Osborn, from Just Leesha. You can find her on Facebook, Instagram, Twitter and Flickr.


Awesome Tutorial. Thanks.
Whilst your tutorial was lovely and just what was looking for, it’s completely useless to me! At least explain what the actions do! You’ve wasted my time here.
Excellent post. I am facing some of these issues as well..
This was awesome! Thank you!
I love this photo! I just have one question: how did you get the lens flare option…did it come with the action or is it something you bought?
Thank you!
Hi Lydia,
Lens flare is actually a built-in filter in Photoshop. You can find it by opening the filter menu> Render> Lens Flare.
Hope that helps!
That photo is beautiful!! Very good tips! Thanks for sharing!
Olivia @ silverspiralstudio.com
Thanks for the tips Alishia!
Thank you Yusrie.
thank you so much for greatfull tutorial
I love this! I never knew how to use the lens flare filter successfully. Thanks so much for the tut. Also: brilliantly sweet photograph!
Hannah of The Lemon Hive
Thanks so much Hannah! Glad it was helpful.
Hei there!
Really loved the after photo! But the link you gave for Clean Edit action can not be found and as i was taking a look at the page you referred to “Greater Than Gatsby” seams that all the actions are quite expensive.
Do you have any other “tip” that wouldn’t cost so much?
Hi Ellen,
My apologies, it appears they are no longer offering that as a freebie anymore. All actions I used in the tutorial were free at the time I wrote it.
What Clean Edit did was give the photo an all around sharpening. The Pioneer Woman offers free actions for Photoshop that can be found here: http://thepioneerwoman.com/photography/2010/03/actions-update-2/
I would use the action Define and Sharpen to give you that extra sharpening when editing a photo.
Good luck!
Please feel free to contact me (via http://www.justleesha.com) with any questions.
Nice Tutorial, but imo ‘play action’ is not fit for a real tutorial.. at least explain what the action does..
Agreed. I can’t duplicate this without buying the action.
Hi Floris,
Sorry about that. I use a lot of actions to streamline my edits (and they were offered as freebies when I first wrote the article). If you have any specific questions you would like answered, please don’t hesitate to contact me personally via my site. I am willing to help and explain anything I can!
Which photoshop program do you use? Is there a free one comparable?
Hi Yana!
I use Photoshop CS3 for all my editing. I personally don’t know of any free programs that offer many of the capabilities of Photoshop, but Adobe (same manufacturer of Photoshop) does have Elements. A cheaper and more user friendly photo editing program.
Hope that helps!
How much is that photoshop program ?
Hi Maria,
Here is the link for more info on purchasing Photoshop: http://www.photoshop.com/.
Though photo editing programs are not cheap, they have many options to choose from. Also, since technologies are constantly changing it’s best to go straight to the source of a product to get accurate pricing. Hope this helps.
Thanks! Fellow Photoshop junkie here myself. I like using such tricks for photos of my cooking (I hate lighting in our kitchen and dining area). Will definitely share your tips with friends.
Thanks so much Cris!