This post may contain affiliate links. Read my disclosure policy here.
Although we love spending time outside during the summer, sometimes it’s nice to escape the heat and stay indoors. As I have talked with people who want to improve their photos, one of the most common questions almost everyone asks is “How can I take better pictures indoors?”
Common problems when taking pictures indoors
A few of the most common problems that people have when taking pictures indoors is that the photos are too dark (under exposed), too grainy, or blurry. Everyone deals with this – even the best photographer!
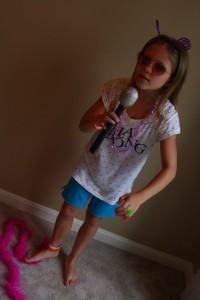
Here are a few pictures I took of my dancing daughter inside my sister’s house.
First, she was too blurry, then she was too dark. Finally, I got one I was relatively happy with.


 The key issue with each of these challenges is light. Simply put, photography needs light, and indoor pictures tend to have too little light.
Understand why common photo problems occur
When conditions are dark, the shutter stays open longer to let in more light. When the shutter stays open longer to let in that extra light, there is a greater chance for camera shake or for your subject to move. Even the slightest movement from the photographer or the subject can result in blur. Also, the more you zoom in, the more likely you will be to have camera-shake. So low light and zooming in are a recipe for a blurry picture.
If the shutter doesn’t stay open long enough to let in enough light, then your picture will be underexposed and dark. Make sense?
Tips to overcoming common indoor photography challenges
General tips (ie – any camera can do this!):
- Increase the light in the room as much as possible. Open the windows (and move towards them) during the day. Turn on those lamps.
- Keep the camera steady. If you have a tripod, consider using it. If not, you can keep the camera steady by bracing yourself against a wall or furniture, or simply by setting your camera down on a table or a stack of books.
- Look for a “night” mode. Typically the night setting will leave the shutter open longer and increase the size of the aperture. Remember to brace that camera!
If you are using a camera with manual settings, here are a few additional tips:
- Use a slower shutter speed. Shutter speed is represented by fractions—the bigger the number, the slower the shutter speed (for example, 1/25 is slower than 1/100)
- You will also want a wider aperture (ie—how wide the lens opens). Check out the aperture tutorial for more detail.
- Increase your ISO. ISO is the cameras sensitivity to light (remember when we all used film, and each roll had an ISO # on it?). An ISO of 100 is great for sunny days outside. When you’re shooting indoors, go for 400 or higher. But beware—the higher the ISO, the more digital noise (like graininess in film) you will have.
A challenge
Take some photos inside this week and try a few of these tips. Show us the results and let us know if any of the tips helped achieve better shots!
To ensure you don’t miss any upcoming Summer Photography Series posts, you can sign up for our RSS feed.
And feel free to grab our Summer Photography Series banner to add to your post!
Written by 5 Minutes for Mom managing editor Lolli. You can find Lolli blogging at Better in Bulk and tweeting at @1momof5.


Emily says
Great tips! My main problem is I often forget my camera even exists…
Jen-Eighty MPH Mom says
I definitely need to practice with indoor photos. I have the same problems you mention above, and I always try to open all blinds, turn on lights, etc. I will try your tips and see what happens.
Thanks Lolli!
Susan says
Laura, thanks so much for these simple, practical steps. I know as a mom so much of the cute stuff my kids do is inside the house and catching photos is much harder indoors.