• Skip to primary navigation
  • Skip to header navigation
  • Skip to footer navigation
  • Skip to content
  • Skip to primary sidebar
  • Skip to footer
Display Search Bar
  • About
  • Contact
  • Subscribe
Follow 5 Minutes For Mom on Facebook Follow 5 Minutes For Mom on Twitter Follow 5 Minutes For Mom on Pinterest Follow 5 Minutes For Mom on Instagram Follow 5 Minutes For Mom on YouTube Follow 5 Minutes For Mom via RSS

5 Minutes for Mom

Main navigation

  • Home
  • Recipes
    • Course
      • Breakfast and Brunch
      • Snack
      • Lunch
      • Appetizer
      • Dinner
      • Dessert
    • Ingredient
      • Apple
      • Beef
      • Blueberry
      • Chicken
      • Chocolate
      • Cranberry
      • Peach
      • Pumpkin
      • Squash
      • Strawberry
      • Tomato
      • Vegetables
      • Zucchini
    • Method
      • Air Fryer
      • Baking
      • Grilling
      • Instant Pot
      • No Bake
      • One Dish
      • Slow Cooker
    • Type
      • Breads and Rolls
      • Cakes and Muffins
      • Condiments
      • Cookies and Bars
      • Drinks
      • Food for Kids
      • Gluten-Free
      • Main Dish
      • Pies and Crisps
      • Salads
      • Sandwiches and Wraps
      • Side Dishes
      • Smoothies
      • Soup
  • Crafts & DIY
    • Crafts
    • DIY
    • Kids Crafts
    • Printables
    • Scrapbooking
    • Sewing
  • Family Life
    • Giveaways
    • Lifestyle
    • Marriage
    • Motherhood
    • Parenting
    • Pet Care
    • Special Needs
    • Time Management
    • Travel
  • Holidays
    • New Year’s
    • Valentine’s Day
    • St. Patrick’s Day
    • Easter
    • Mother’s Day
    • Fourth of July
    • Halloween
    • Thanksgiving
    • Christmas

Scrapbooking Made Simple: Easy Page Layouts

September 20, 2012 by Ellie Augustin

This post may contain affiliate links. Read my disclosure policy here.

ShareTweetPinPocketMail

In my last post, Scrapbooking Made Simple: Getting Started, I mentioned paper kits. They are a great source for creating quick and easy pages without spending a lot of money. In this post I’ll show you how.

Before I begin a scrapbooking project, I like to set up my supplies so I know what I will be using.

collage Easy Page Layouts

Since I used my boy’s baseball pictures in this project, I chose to work with the Echo Park :Grand Slam Mini kit. This kit is only $6.99 and it includes 6 12×12 double sided papers and a 6×12 Element Sticker sheet. I also brought out a couple of pages of cardstocks.

Along with the paper and photos, I pulled out the tools I would use (you can check out my previous post to see what the basic items would be), and last but not least an assortment of embellishments.  Even if you don’t use all of your supplies at once, it’s handy to have them on hand.

Now let the fun begin!

Layout #1: Combine Several Elements

Here is the first layout I created of my youngest son :

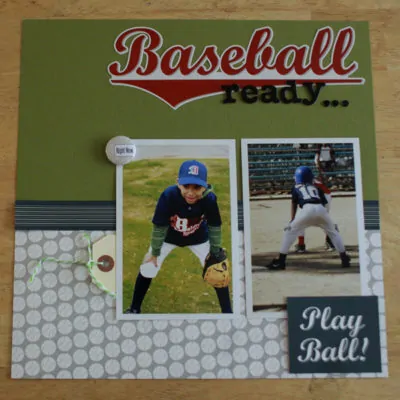
To create this layout I used one of the cardstock sheets to serve as the base of the page. I took one of the patterned papers and cut it in half (6 x 12) and adhered it to the cardstock. Using the same patterned paper I had just used, I cut a 1 inch strip, flipped it and used the other side on the page.

Next, I picked two pictures that worked well together. While choosing the pictures the title of my page came to mind. It happen to be perfect because the sticker sheet had the word “Baseball” and I just added “ready” using chipboard sticker letters.

I used a tag to document a few words and tucked it under one of the pictures. I will do this so someone who is looking at the finished album can enjoy the layout without having my message and thoughts out in the open. Note: when adhering pictures I place adhesive on the corner of the pictures that way if I want to tuck anything under them I am able to do that.

I took one of the patterned papers and cut it up, as it has many pieces I thought I could use on other pages I would be working on. This is another way to cut down on cost. To finish, I added a badge with a saying that was from my embellishments I had pulled out.

Layout #2: Focus on One Photo

My next layout is of my oldest son. I wanted to show you how you can use just one photo on your page.

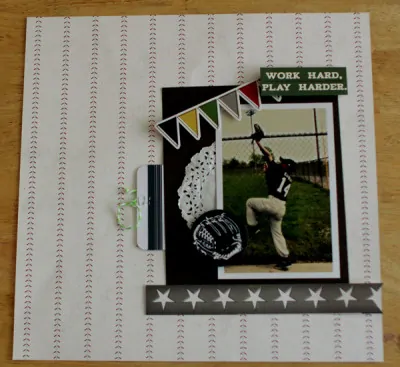
This time I used one of the patterned papers as my base page. I cut a portion of another cardstock to become the start of the layers I would create.

Steps for Easy Page Layouts

After I laid down the cardstock and picture, I took one of the pieces I had already cut from the patterned paper and created a V with my scissor to create a banner for my page.

The sticker embellishment sheet and foam dots were used to create dimension on the page. For the journaling I used one of the Becky Higgins Journal cards. Once again, I took from the patterned paper I had already cut for my previous layout and used it to add a decorated touch.

Layout #3: Use Journaling to Complement Your Picture

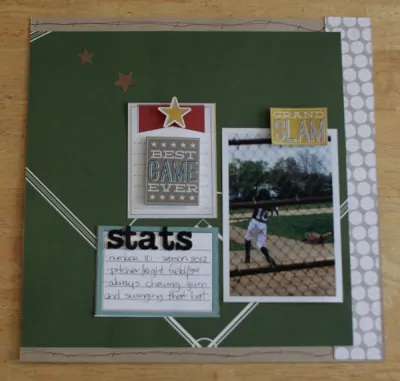
For this page, I cut the patterned paper to 11×11 and placed it on a cardstock base. I decided to use the last strip of patterned paper from Layout #1 and Layout #2 to tie everything in. This is a wonderful way to ensure you use the supplies you have set out to use.

Using a pen to make handmade embellishments is another way to add your own personal touch to your pages. As you can see I created a border.

The journal cards were my focal point, and I placed the sticker embellishments on the cards using foam dots to create height. Title of my “Stats” card was made using chipboard alphabet stickers. This is where I wrote a bit of information about my son’s baseball season. You could do the same with any image you might be using. I plan on doing a similar page for my little girl focusing on the 1st week of school using the title “1st Week” and processing with a bit of information.

After creating these layouts I still had plenty to work with on other pages or other projects!

leftover page kit items

I hope my layouts and tips have helped you want to try to create a few of your own layouts to document your special memories.

ShareTweetPinPocketMail
Does Dove Clinical Protection Really Work?
When You Feel Like You Have Swallowed Hot Lava

About Ellie Augustin

Loving life through my children's eyes while getting a little dirty with inks & stamps and the click of a camera not so far away. Read more at my blogs Adventure through My Lens and Adventures with Ellie.

Reader Interactions


Leave a Comment Cancel reply

Recipe Rating


This site uses Akismet to reduce spam. Learn how your comment data is processed.

1 Comment

  1. AJ says

    October 3, 2012 at 11:21 am

    CUTE layouts Ellie!!

    Reply

Primary Sidebar

Bringing Moms Together

We are Janice and Susan, twin bloggers and work-at-home moms. We're here to inspire, encourage & empower you.

Meet Us…

Work With Us…

Footer

Recipes

Traditional Irish Soda Bread Recipe and History

Traditional Irish Soda Bread Recipe and History

25 Awesome Rainbow and Green St. Patrick’s Day Treats

25 Awesome Rainbow and Green St. Patrick’s Day Treats

Easy Valentine Sugar Cookies

Easy Valentine Sugar Cookies

Crafts/DIY

Easter Egg Painting – How to Paint Easter Eggs with Acrylic Paint

Easter Egg Painting – How to Paint Easter Eggs with Acrylic Paint

DIY Flower Press – How To Press Flowers

DIY Flower Press – How To Press Flowers

Valentine’s Day Crafts For Kids – Super Cute and Easy Valentine Craft Ideas

Valentine’s Day Crafts For Kids – Super Cute and Easy Valentine Craft Ideas

Giveaways

Valentine’s Day Gifts For Mom

Valentine’s Day Gifts For Mom

School Supplies List and Back to School Shopping Guide

School Supplies List and Back to School Shopping Guide

REDEEMING LOVE Set to Strike Gold on the Big Screen #RedeemingLoveMovie

REDEEMING LOVE Set to Strike Gold on the Big Screen #RedeemingLoveMovie

Follow 5 Minutes For Mom on Facebook Follow 5 Minutes For Mom on Twitter Follow 5 Minutes For Mom on Pinterest Follow 5 Minutes For Mom on Instagram Follow 5 Minutes For Mom on YouTube Follow 5 Minutes For Mom via RSS
  • About
  • Contact
  • Work with Us
  • Privacy Policy
Copyright © 2023 5 Minutes for MomTheme by Melissa Rose Design and Once Coupled