This post may contain affiliate links. Read my disclosure policy here.
Marcel Walker, professional photographer, walks you through getting off Auto on your point and shoot and your DSLRs too!
5 Minutes for Mom Photography — Basic Settings Tutorial Part 2
Apples and your Settings
Last week I wrote a post on learning to use your settings. A commenter named Rebecca made a very good observation that if I was going to compare shots, they both needed to be apples, not apples and oranges!
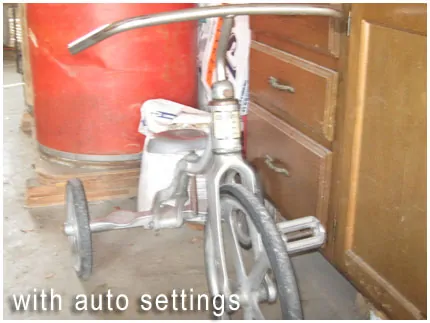
So this week, I went looking for apples. Now, these images are not exactly the same, but they are indeed both apples (maybe like Fuji vs. Gala).
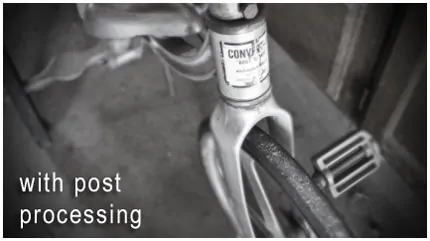
The image is entitled, “The Story of a Trike.” This tricycle, thirty years old, has a incredibly beautiful story which I will save for another time.
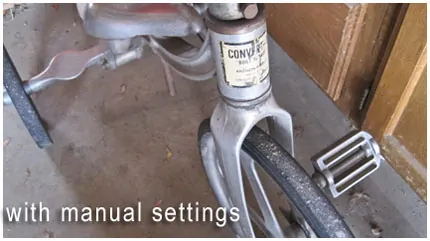
It was shot with my basic manual settings with a Canon D1200 — a $150 point and shoot camera. It was processed in basic Photoshop with basic steps, but the editing could have been done in most other programs.
Above is my shot using Auto. May I say that in this case, Auto performed exceptionally poorly.
My point being, that if you want to capture the moment you care about, the more you know about using your settings, the more power you have to capture it the way you want to. Shooting in Auto is like talking a nice long walk down a rural road. Well what if someone asked you, “Hey how about walking though Vienna during the spring, on the beaches of North Shore of Hawaii?” Doesn’t that sound more appealing?
So here we are inviting you to take some more appealing walks. You may have to do some traveling, but you’ll get there. Our directions may not always be clear, so please let us know if we sound a little garbled (thank you Rebecca).
Here’s my shot in manual from my point and shoot. And here’s what I did to get it:
(I’m just going to cover a lot of information and some may feel like you’re drowning, just float for a little. Or hearing a lot of foreign language. Just pretend you’re in an immersion language program. “Hola! Buenos Dias!” — No, I do not now how to make upside down exclamation marks or put the accent on the “i”, remember we’re “pretending.”)
First, I opened my handy dandy manual and found ALMOST no really useful information. Canon assumes, if you want to buy a camera for $150, you probably don’t want to know too much. WRONG!
So I dove in on my own and here is what I did: (NOTE: We will cover each of these steps in greater detail in future posts — don’t panic!)
- Changed the White Balance
After pressing many butttons many times, I was able to change the white balance so that it was customized (so thus the picture looks a little cooler, more blue tones). - Changed my ISO
It was dark and inside a garage so I set my ISO, to 400. I set the picture mode to be macro (low depth of field so not everything was in focus). - Changed my Focus Point
I changed my focus point to dead center – I wanted to pin point one exact focus point on this shot. - Boosted my Exposure
There was an option to boost your exposure so I pressed that up a bit — that brightens up my shot. - Changed my Shutter Speed
There was a night time snap shot mode. What in perdition is that?!? It is a slower shutter speed. - And finally a touch of Photoshop
In post processing, I boosted the color and contrast a bit.
FINAL RECIPE:
So the actual settings for this shot f/2.8, ISO 400, and a shutter speed of 1/15 of sec. No tripod, I stood very very still.
Now if you don’t know what all the above information was about — no worries. We are going to have several writers here at 5 Minutes for Mom Photography and we are going to cover it all! Just take it one photo at a time and remember knowing your settings gives you power!
And please put your questions in the comment section — I will answer you there too!
Next week, I’ll begin going over the settings in greater detail. (The first time I sat in an advanced Photography workshop, at the Salt Lake Arts Center, 95% of the content went over my head. But the instructor, Rodger Newbold, was very encouraging and I so I continued to return and I still have so much to learn.)
oh, and how did I process this shot?
That is also another story — one that we will be covering as well here at 5 Minutes for Mom Photography. So just keep your eye on your reader. We are getting there!
Learning to edit well is like being offered to drive a Maserati. Your editing software is your own personal darkroom and can take you far and fast. Ansel Adams was a master in the darkroom.
I know some of you wrote and asked about editing in other programs. Most of the writers, I believe, will be doing tutorials in Photoshop, but the principles will apply in most editing programs.
I hope these tips help and I am looking forward to getting in to the details of settings next week!


vedic math says
Very good post. I certainly loive thus website.
Continue the good work!
do choi xe hoi says
Your style is unique compared to other people I have read stuff from.
I appreciate you for posting when you have the
opportunity, Guess I’ll just bookmark this page.
Lois of HisFireKids says
Thanks
I am so green with my new point and shoot. I spent a few extra $ but it is so complicated my pics stink=)
Suzanne (Crunchy green Mom) says
YAY… Very excited to have some explanation, etc.
Here are some questions I ran into this weekend.
I am using a Nikon D5000.
*I did a media shoot at Arena cross this weekend. I took over 1200 photos and had a TON of them blurred. I wanted a lot of in the air shots and many of them were blurred. I had it on the “Active/sports” setting. How to I combat that?
*When you are taking shots with a white stage and a black audience, how to you fix the blur of white lights (Daughter graduates in a month, I’d love to know the best way to take these shots before the time comes.)
Marcel says
Without seeing your shots, this is what I’m GUESSING happened. I’m guessing your focal setting was adjusted to a number of focal points rather a using just one focal point. So your camera was just “guessing” what to focus on. You can change your focul point settings in your menu settings.
You camera can not read all the information available to human eye. It chooses, deatils in the darks or details in the white. So exposure will be key. When your daughter graduates, zoom in and meter on what you want to be exposused properly. Here are some tips. http://www.best-family-photography-tips.com/metering-mode.html
I’m not sure what you mean about the blurry lights, but if you send me shot, I might be able to help you out some more. [email protected]
Good luck and congratulations to your daughter!
purple moose says
WOW! I am looking forward to getting a translation of all these terms. I think this will be a helpful series, thanks so much! And I second the need for the “apples,” I looked at the first post’s pics back and forth. I could not see them very well and wondered what was wrong with my monitor because they did not look like the same shot. 🙂
Marcel says
Good point, only apples to apples from here on out! (Janice said the same thing:) It was not the exact same ahot, but close. I will keep that in mind for future posts.
Jen says
All of this setting changing seems like it would work great on “still” subjects, but do you do the same on moving ones, such as kids? Seems like a lot of changing would need to take place with almost every shot and then the shot would be gone. I keep trying to play with my settings and almost always “parts” of my pictures will be clear and JUST the way I’m envisioning, but there will be a blurry hand or arm or something that is SO frustrating! Will you cover that in the future? SO glad to have stumbled on here! I’m in desperate need of photo HELP! 🙂
Marcel says
Great question Jen. You’re right, almost every shot requires different settings. I hope this gives all some perspective for great photographers and how much goes into getting the right shot:) I’ll be covering the specifics more in detail. Any time you want to see anything covered, let me know. Best!
Heather says
Way to go Marcel! Glad to see you on here giving some tips! I wish more people would take THIS advice above all others…so important for great pics!
Marcel says
Thank you for the kind words. Some easy things to do that can save you a lot of time afterwards:)
Erica Mueller says
Marcel,
I have used Fireworks for years, but just got a trial version of Photoshop Elements because I needed it to complete a client project. I’m going to end up buying it, and it’s only $99. Anyone who is serious about wanting to edit their photos should save up and buy it!
Janice says
I agree!!! I have used Elements for years and I couldn’t live without it!
Marcel says
Good for you girl! I think one of the best things you find is not only all your options, but all of your support that’s available anywhere from here to yourtube! Keep us updated on how it goes:)